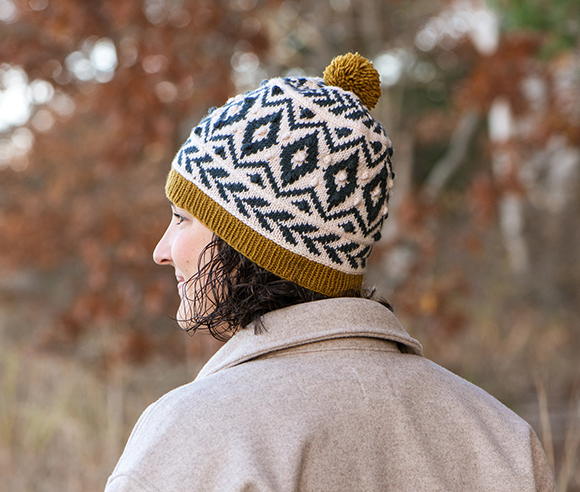
Recently, someone reached out and asked how she could purchase the Zelda Cloche pattern.

I thought, This lady probably doesn't know how the internet works.

Zelda is one of my all-time top-selling patterns. It was among my first designs published in a knitting magazine, then sold digitally on Interweave's website after publication. I've probably sold thousands of copies of this pattern PDF, and for more than a decade it reliably appeared near the top of my royalty reports.

All she needed to do was click the “buy now" button. Except…I still owed this person an email, so I went looking for the link.

I Googled “Zelda Cloche Knitting Pattern." The first result was the Ravelry page. Great. I clicked the purchase link and was bizarrely directed to a completely different pattern by the same name, from a different designer, on Interweave's website.

Huh? More Googling ensued. I searched Interweave's website directly. Nothing. Sure enough, there was no way to purchase the Zelda Cloche anymore. Interweave had quietly removed it from their catalog.

Come to think of it, my royalty payments had been pretty low lately. I'd chalked this up to changing fashion and the passage of time and, with a deep sigh, went on with my life. Apparently there was another explanation.

Then I had a more alarming thought: Were there others like this? Yes, it turns out. MANY! This needed my attention.

I began digging through my archive and all the old contracts. I'm not a lawyer, obviously, but I've seen enough contracts—and written enough of my own—to muddle my way through the legalese. This was no small task. Probably more than half of my designs were originally contracted or licensed to various publishers, all with different terms, and some of those old contracts are incredibly opaque.

This is probably why I never touched many of these designs again. I had assumed they were essentially locked away with their original publishers. But they weren't!

A few of them basically are off-limits, including, sadly, all the patterns from my book Graphic Knit. But I discovered that many of my old Interweave magazine contracts were surprisingly agreeable. I had retained the copyright to the patterns I originally submitted and, after a waiting period, could publish my own editions—as long as I didn't use Interweave's edited versions, photography, or other materials they created.

I felt both delighted and a little silly. I could have revisited some of these patterns years ago!

Thank goodness I'm an organized pack rat. I still have my original files, notes, contracts and samples. In Zelda's case, I even have my own high-quality photos from the day I mailed the sample off to the editors at Knitscene back in 2011. Look at that baby face!

This nice lady was going to get her hat pattern after all!

Of course, once I opened the old pattern, I didn't want to simply dust it off and put it back up for sale. I'm a much more experienced designer now than I was in 2011, and there were plenty of things I could do better.

So I went back to my original pattern and created a new Knit Darling edition. I clarified the instructions, added more photos to explain the button loop, and added video tutorials for some of the finishing techniques. I redesigned the PDF from scratch using my own photos and my current pattern template.

And the nice lady who started this entire investigation? She tested the new pattern for me. Full circle!

So, once again, I'm introducing the Zelda Cloche—Second Edition—now available from Knit Darling, Ravelry, and Payhip.

Zelda wasn't the only missing pattern I found.

There are quite a few old designs in my archive that I could revisit, improve and bring back under the Knit Darling brand. Honestly, going through all of them could become a full-time job, and I definitely don't have the bandwidth for that. So I'm not going to turn it into one. I'll rescue the ones that call to me, as I have the time and inspiration to do them. Zelda just happened to call first.

And all because one very nice lady knew how to use the internet better than I did.

Sign up for my newsletter for the latest updates or follow along on Instagram.

Sep 10, 2026

The history of Knit Darling goes back pretty far. I designed around 100 patterns over a ten-year period, then things kind of fizzled out when I became pregnant with my first son, Arlo. Now I find myself at an inflection point, so I've been looking back at all this work and thinking about my path and what it all means.

The timeline goes roughly like this, if you're curious:

  • 2009 — Published my first free pattern, the Op Top
  • 2010 — Started the blog; self-published a dozen patterns in one year
  • 2011 — Began designing for yarn brands and magazines; first collection published in Knitscene magazine
  • 2012 — Got a book deal with Interweave Press
  • 2013 — Published my second collection, Winsome Knits, with KnitPicks
  • 2014 — Graphic Knits was released with 20 patterns; national book tour
  • 2015 — Got the cover design on the Fall issue of Interweave Knits
  • 2016 — Third major collection, Speckle and Stone, published
  • 2017 — Fourth major collection, Homage, self-published
  • 2018 — Keynote speaker at the Zombie Knitpocalypse; designed for various yarn companies; UX design school
  • 2019 to present — Started Twill Creative, had a kid, co-founded BrandAction.org, IVF, had a second kid…and averaged only one pattern published each year for seven years.


Reading that last line, this is not really how I imagined the trajectory of my knitting pattern design career going. Probably if you had asked me in 2012, the ink still fresh on my book deal contract, I would have said that ten years forward, my life would be completely centered on knitwear design and I would be a household name (among knitters). But that's not really the case.

But looking back at all of this now, the thing that strikes me most isn't where the trajectory changed. It's the work itself.

I made more than 100 patterns!

When I look at them all together, I see a cohesive body of work that didn't feel cohesive at all while I was making it. Apparently I had a specific aesthetic all along. Maybe I knew that on some level, but the more work I made, the more it all became unmistakably “me." Looking back now, I can see it.

There are surprisingly few patterns that make me cringe. When they do, it's mostly because I can see exactly what I would do differently today.

My very first free pattern, the Op Top, went absolutely viral. There are so many Op Tops out there, that I once spotted one in the wild on the streets of New York City. At the time, this was thrilling. Today I look at the colorwork shaping at the crown and think, Oh honey. I really did not know what I was doing yet.

Then there are the patterns that make no sense to me from the opposite direction. The Shilah Cardigan should have been a hit! It is still one of my favorite sweaters. I've worn it probably twenty times a year for years, the pattern is well written, and I think the design still looks stylish. Number of projects on Ravelry: two. And one belongs to my mother.

You just never know.

I also remember what it felt like to publish patterns in those early days, before Ravelry was so saturated. It was absolutely electric. I originally released the Delancey Cardigan for $1.99 (ha!) and sold hundreds of copies on opening day. What a day! That pattern stayed popular for many years. Looking at it now, the silhouette is so 2010, but the construction is still really interesting. Around its tenth anniversary I had an idea to make a “Fancy Delancey" mini-collection of spin-offs using the same novel construction method. I was too busy, and the moment passed.

Maybe I'll come back to that one someday. Who knows?

More than any of that, though, looking through these patterns brings back memories of what was happening in my life while I was knitting each sample.

I remember knitting on a red-eye to Ireland instead of sleeping. I remember all those knit nights with the Cobble Hill crew. I remember the business trip where I accidentally left a piece of the cardigan I was knitting in my hotel room. I remember casting on the hem of the Liwi top, looking down at my needles, and realizing that for the third time in a row I had somehow cast on exactly the right number of stitches without counting. A new skill! Isn't the subconscious mind amazing?!

And I remember seeing the finished photography for Graphic Knits for the first time. That was a big one. I'd spent years feeling like I was somehow pretending to be a knitwear designer, and suddenly I was looking at this beautiful, professionally photographed collection of twenty designs that I had made.

Imposter no more!

Looking back, the arc probably hits its peak with my book deal with Interweave. That was a point in my life where I had completely saturated myself, if that makes sense. I could not fit one more tiny thing into my life, so anything new would require sacrificing something existing. I actually felt pretty amazing then—like the well of my creative powers was so deep that it would never dry up. I thought I was on a rocket ship that would only go UP! But things eventually ebbed and my trajectory shifted.

One thing I've learned since then is that there are grand cycles in life. There are highs and lows, busy eras and calm times, and everything comes around again. Looking at these patterns now, I don't feel like I'm looking at a career I abandoned. I'm looking at this incredible body of work that I'm still building.

And, interestingly, I realized that going back isn't even new for me. There are already patterns in my catalog that I've revisited, reknitted, improved and republished over the years. Apparently I've always liked returning to an old idea to see what else I can do with it.

So that's what I'm going to do.

Some of these patterns are perfectly happy where they are. Some could use a little love. Some have disappeared from the places where they were originally published. And some are giving me ideas all over again.

I'm curious to see where they take me next.

Reach out on Instagram if you want to engage. Sorry, the bots have ruined blog comments!


Sep 1, 2026

Hi there! It's me, Alexis Winslow. I know it's been a minute, and you might not remember, but we met a while ago. I feel bad that we've lost touch. Let's catch up.

Where did I go? What have I been doing? Digging myself out from the avalanche of obligation and responsibility that happens when you start a family. I can see light, though, so no search party is necessary. I could go back a few years, but let's start with how 2026 is unfolding.

January was a turning point. I visited an “art cafe" here in Brooklyn with some of my girlfriends, where we each assembled a “vision board" in an attempt to manifest our dreams and goals for the new year. I'd never done this before, but I liked the idea of starting the year with a little intention.

Rowan was just barely one year old, I was finally done with my breastfeeding journey, and I felt like a fog was lifting. As my sons were becoming less dependent on me, I hoped that 2026 would be a time to find myself again as a creative person—and frankly, be a little more selfish with my time. I felt like I'd finally have a little more bandwidth and wanted to think carefully about how I filled any extra time I might get.

The vision board exercise has been helpful. The first thing I did was book a “girls only" trip with a couple of friends for a long weekend in Mexico City in February. I packed my sketchbook and vowed to carve out some time on the trip for drawing. I downloaded Duolingo and started brushing up on those old Spanish skills, dormant since high school, and, of course, wound up some of that gorgeous yarn that I'd purchased more than a year before at the Sheep and Wool Festival in Rhinebeck.

I had one morning to myself in Mexico City while the other girls had plans. I visited a museum by myself and read every plaque. I wandered through a park and found a beautiful fountain—Venus with two cherubs. It reminded me of my two babies. I thought, I want to remember this, so I got out my sketchpad and quickly drew the scene. That moment of just having some creative space with myself truly felt like a turning point.

Spring arrived, and another friend mentioned that she was headed to a beginner watercolor class and they still had a spot open. If I hadn't set the year with a specific intention to find my way back to myself creatively, maybe I would have found an excuse. But I happened to be free that night, and it seemed like the universe was steering me forward, so I joined her. Next thing you know, I'd purchased my own watercolor set and was learning the basics from tutorials on YouTube. I used to paint with acrylics, but watercolor seemed more approachable in this era of my life—compact and fast, perfectly suited to a busy mom who lives in a Brooklyn apartment. No easel necessary.

Summer rolled around, and boy was it busy at Twill Creative (my own little design studio where I do branding design, build websites, and do UX design consulting)! I was sketching, I was painting, I was conjugating Spanish verbs, and feeling great about all that. But then I started thinking about Knit Darling. I'd been dabbling in knitwear design with commissions from various yarn companies, but not much beyond that.

I'd carried a lot of guilt about pattern design, feeling like I'd neglected this thing I'd spent so many years building and now couldn't keep up with the industry. Between social media burnout and an overwhelming Ravelry landscape, standing out felt next to impossible. I missed designing, but I couldn't quite see what returning to it was supposed to look like.

All of this had my head spinning. I decided I needed a reframe. This slow period hadn't been a time of neglect. It was more like when a farmer lets a field lie fallow in order to restore fertility to the soil. Starting a family is intense. I needed a rest to recharge creatively.

Social media isn't my thing, and that's fine—I don't have to follow anyone else's playbook. I'm coming back to Knit Darling now with a new intention. I started with a humble blog, and that's where I'm coming back to it again. Maybe no one is reading, and honestly, that's freeing.

I have old patterns I want to revisit, some half-finished ideas tucked away, new things I want to make, and apparently quite a lot I still want to say about knitting!

Hello again. Welcome to fall. Let's knit.

Reach out on Instagram if you want to engage. Sorry, the bots have ruined blog comments!


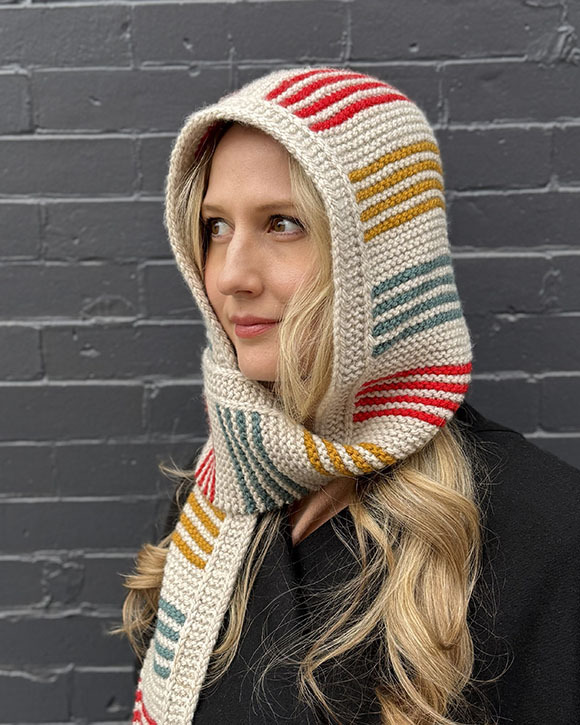
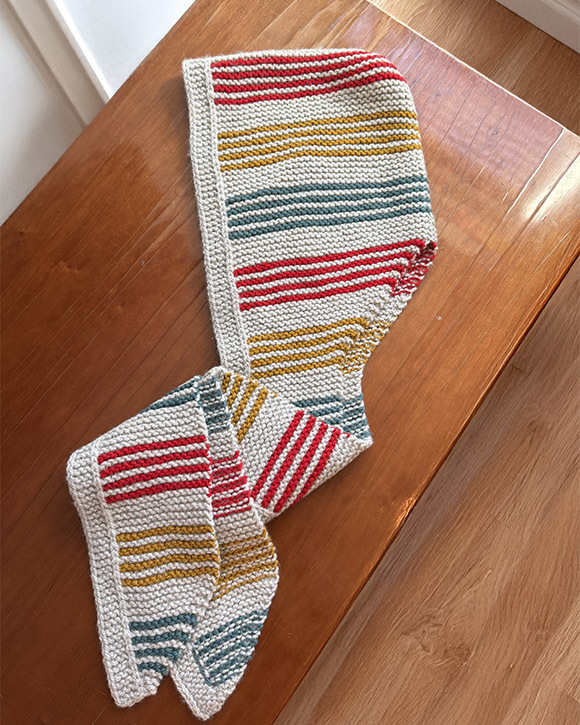
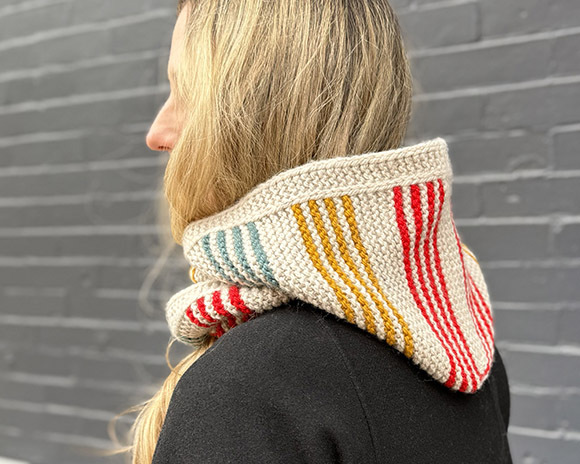
I'm excited to finally share Chromia Hood, a new knitting pattern pattern that I designed for Quince & Co. that officially launched this weekend in conjunction with Vogue Knitting Live. The sample and the pattern made their debut on the VKL show floor, which still feels a little surreal (more on that below!)

This design has been bouncing around my head for QUITE a while (turns out, motherhood is no joke!) The concept started as something much bigger and more complicated before it found its right form in this fun little accessory.


From an Unfinished Idea to a Finished Pattern

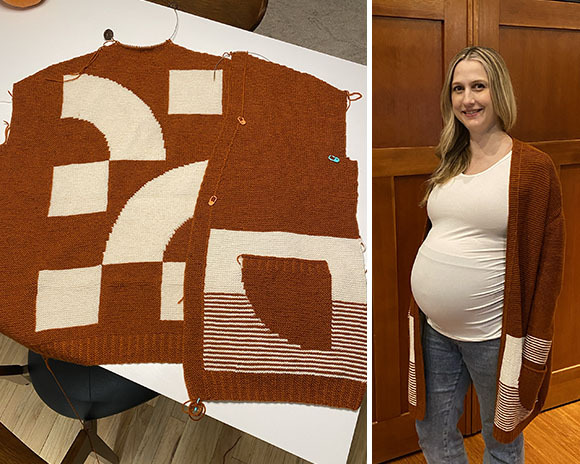
Many of the details in Chromia Hood were first explored in a different design I worked on more than a year ago. That earlier piece was a cardigan featuring similar intarsia stripes and border treatments, but on a much smaller scale and with far more complexity.

As the cardigan design progressed, it became clear that it was probably never going to be published. It relied on a lot of advanced techniques and leaned heavily into an artsy, experimental space, which meant the audience for it would likely be quite small. Around the same time, I was also extremely pregnant (as you can see in the pic below) with my second son and heading into the final stretch before Rhinebeck 2024. Between the complexity of the design and the reality of impending newborn life, it simply was not a project I had the time or energy to push across the finish line.

Even so, I loved many of the details.

The graphic intarsia stripes on garter stitch, the combination of i cord and slipped stitch edging, and the overall visual language of the piece stayed with me.

When Quince & Co. later reached out with a request for accessory designs, I immediately thought back to that cardigan. Accessories felt like the perfect place to revisit those ideas in a more focused, approachable way. Chromia Hood grew directly out of that moment.


Color and Detail

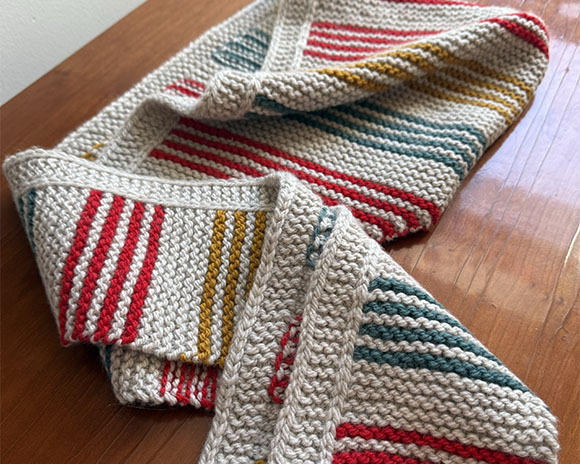
The bold striped sections in Chromia Hood are worked using a basic, approachable intarsia technique. Because the stripes are straight and regular, the color changes are very easy to manage.

Along the edges, a built in i-cord pairs with a subtle slipped stitch border. These small details frame the piece and give it a polished finish, without overwhelming the simplicity of the overall fabric.

I describe all of these techniques and more in a technique tutorial video which you can see below (also linked in the pattern).


The Yarn

Chromia Hood is knit in Osprey by Quince & Co., an aran-weight yarn spun from 100% American wool. Osprey has a beautiful balance of structure and softness. It is plush and squishy in the hand, with enough body to hold the graphic stripes and hood shape, but soft enough to wear comfortably against the neck and face.

Despite being a woolen yarn, it is not itchy at all, which was especially important for a piece designed to sit so close to the skin. It is a real pleasure to work with on the needles, and the generous color palette made it easy to find a combination that felt bold, graphic, and still very wearable.

If you are substituting yarn, look for an aran-weight wool with good loft and elasticity so the garter stitch fabric stays cushy and the hood keeps its shape.


Construction, Speed, and Difficulty

Chromia Hood is worked flat in one piece from tip to tip, then folded and seamed at the back of the head to form the hood. The shaping is created with straightforward increases and decreases, which make the knitting intuitive and easy to follow.

Knit on US 10 needles with aran weight yarn, this is a fast project. It is especially well suited to confident beginners or intermediate knitters who want to try intarsia in a low pressure way, without committing to a large or highly technical garment. The chunky gauge, garter stitch fabric, and rhythmic color changes make it a satisfying knit that moves quickly while still staying engaging. For knitters looking for something that feels substantial but does not require weeks of commitment, this project hits that sweet spot. You could probably knock this out over a couple of weekends.


A Hat, a Scarf, or Something In Between

This is not my first hood, and it is certainly not my first scarf, but it is my first "hooded scarf" to design. As an accessory category, hooded scarves seem to have really surfaced over the past few years, though I'm sure they're not actually new.

There is something a little old world about them. They bring to mind practical layers worn by grandmothers, or perhaps something that might frame a perfectly set 1960s bouffant. At the same time, they feel very current. Comfortable, unfussy, and quietly confident.

I think we can thank Gen Z for helping push this kind of accessory back into the spotlight. Their embrace of comfort, warmth, and function over trend driven impracticality has made space for pieces like this again. For that, I am deeply grateful. Especially for the rejection of ankle socks. Gen Z, please also take a look at leg-warmers. It's time! And, I have some ideas...

At its core, Chromia Hood is about flexibility. It offers the warmth and coverage of a hat when you need it, but behaves like a scarf the rest of the time. Easy to pull on and off, comfortable indoors, and adaptable to different ways of wearing. When it came time to categorize it on my site, there wasn't a perfect fit. In the end, I chose Hat, even though the piece happily resists a single label.


Launching with Quince & Co. at Vogue Knitting Live

Releasing this pattern in partnership with Quince & Co. and debuting it at Vogue Knitting Live has been incredibly special. The sample was displayed in the Quince & Co. booth, and the pattern was part of a show giveaway, which made the launch feel communal and celebratory.

I am deeply grateful to Quince & Co. for their support throughout this process, and to everyone who stopped by the booth.


The Pattern

Chromia Hood is available now here on my website, through my Ravelry shop, on Payhip, and at Quince & Co so you can get started right away. I can't wait to see how knitters make it their own, whether that means bold contrast or a quieter, more subtle palette.

You can find the full pattern and materials list via the links above. Also, I'd love for you to find me on Instagram and tell me what you think!

As always, thank you for knitting along with me.

Feb 11, 2024

My daughter and Knitdarling, Alexis Winslow, has allowed me a guest blog to introduce my special project, the Beaver Scarf.

Of course, it is a riff on the Pussy Hat which was replicated in the many thousands in 2017. (Do you have a Pussy Hat in your hand-made archive?) It's main attribute was that it was pink, readily recognizable and conveyed a message of solidarity and kindred feeling. It was fun and passionate. If you marched in or witnessed a Women's March during that tumultuous year, you know what I'm talking about…

The main concept behind the Beaver Scarf regards the important function beavers play in their environment. They are known as nature's ecosystem engineers by their industrious building of dams that create wetlands allowing many other plants and animals to flourish.

We too are ecosystem engineers who create environments around ourselves: among our family and friends, our schools and workplaces, our neighborhoods and social groups.

At a time when many people have anxiety about climate change and social change, it is easy to feel hopeless about the challenges facing us. But if we feel that our individual efforts can add up to meaningful, positive collective action, perhaps the outlook will improve for all of us. Our everyday choices and interactions determine whether our lives generate happy outcomes for ourselves and others.

In this important year, I am hoping we can do a group project together that conveys that we see ourselves as ecosystem engineers, creating environments in which we ourselves and others can thrive. The Beaver Scarf should express our intentions to live in ways that diminish harm to our environments and also expresses kindness and support to others. In this election year, I believe there are many, many people on all sides who are concerned about the changes in our climate and communities that could be detrimental to others' well-being. I am hoping we can make ourselves visible to each other and to our elected leaders when they see someone wearing a gorgeous green Beaver Scarf.

The main attribute of a Beaver Scarf is that it is green. It can be a simple project or a more elaborate depending on one's skill and inclination. Knitdarling has designed three scarves that are available free for beginner and intermediate knitters. I am hoping that creative crafters will make many different versions of green Beaver Scarves. As a project, it won't take long to make and also gives us the opportunity to share our hand-crafting skills with others.

The pdf linked here explains more about the concept and includes 3 free patterns designed by Alexis. The scarves are Baby Beaver, Busy Beaver and Brave Beaver. All are fun to make and need only one or two skeins of yarn.

Brave Beaver Pattern:


Busy Beaver Pattern:


Baby Beaver Pattern:


One other element: I hope that people try to knit with someone else. Even better, create or find a group of people to do handwork with. At a time when so many of us are spending hours alone online, spending a relaxed time with other people is good for our mental health and well-being. Remember, our goal is to create environments that will help others to thrive.

Please share your version of the Beaver Scarf on Ravelry and Instagram. I hope many of you will participate in this group project, expressing your intentions to live sustainably and supportively in community with your family, friends, neighbors and fellow citizens. Make yourself seen in green: #GreenBeaverScarf

The Vikkel Braid, also called a Lateral Braid, or Estonian Braid, produces a beautiful decorative braid effect. It's gorgeous, the only problem is that if you're working in the round, it leaves a pretty hideous jog at the beginning/end of the round.

I've used this method many times in my design work and each time I have tweaked my instructions slightly to deal with the jog problem. I recently used this technique on my Arquette Pullover to add a decorative border at the bottom of the neckline ribbing. After some small nudges from my pattern test knitting group, I decided to once and for all settle the issue.

I researched dozens of methods and did a *ridiculous* number of practice swatches to come up with the perfect mash-up of techniques. I'm going to demonstrate a few methods for working the Vikkel braid in the round without a jog (!)—an “easier method", a “harder method", and a modification to make them both work if you are doing the braid in a different color than the row below. I'm also throwing in the holy grail perfect method, but I'm telling you it's probably not worth it (but maybe it is).

If you're more of a video person, you're in luck. Check out my abbreviated video below, which describes both methods and the 2-color mod.


Before we can talk about how to deal with the jog, I should explain the basic technique for creating the Vikkel braid, which works either flat or in the round.

How to work the Vikkel Braid Stitch:

1. Switch to smaller needles – about 4 sizes smaller. The resulting stitches after working the braid tend to become extremely loose. The smaller needle keeps this in check

2. Work a “Braid Stitch" as follows:

a. Skip the first stitch, tilt the work forward slightly, knit into the back loop of the second stitch—do not drop the stitch;

b. Knit into the front loop of the first stitch

c. Drop both sts from the left needle.

d. Slip the last st on the right needle to the left.

3. Repeat step 2 to the end of the round but don't slip the last stitch over to the left needle.
4. Work either method below to close the braid.


Joining the Braid—Method 1:

(The Easier Method)

This is a very tidy join, and probably all you really need. Work the Vikkel braid instructions to the end of the round, but don't slip the last stitch back to the left needle

a. Identify the first braid stitch;

b. Insert the right needle behind the first braid from the top to the bottom;

c. Lift first braid stitch onto left needle;

d. Knit into the back loops of the braid stitch treating both legs as one. —1 st increase

e. Eliminate the new stitch by passing the second stitch on the right needle over the first.

You may switch back to the original size needles as you work the next round.

Joining the Braid: Method 2

(The Harder Method)

This is truly an almost perfect join, but it involves a crochet hook which adds a slight layer of complexity. Just as with Method 1, work the Vikkel braid to the end of the round, but do not slip the last stitch back to the left needle.

a. Insert a crochet hook (similar size to needle) behind both legs of the first braid from top to bottom.

b.Turn the hook counter-clockwise so that the hook aligns with the left needle; hook the first stitch on the right needle;

c. pull the stitch off of the needle;

d. Pull the loop all the way through the braid stitch

e. Place the stitch on the left needle and remove the crochet hook.

f. Insert crochet hook through the top leg of the last braid stitch from top to bottom;

g. Hook the first st on the right needle and

h. Pull the loop through the last braid stitch; place the st on the right needle.

You may switch back to the original size needles as you work the next round.

Vikkel braid in the round with a new color:

Work either the “easier method" or the" harder method" above, but at the beginning, knit 1 st with the new color, then replace the stitch just worked back onto the left needle before proceeding with the instructions as written. This will leave a tiny gap below the braid, but it's hardly noticeable.

If you want to knit the braid as a stripe of contrasting color, there is yet another special technique that requires working both colors across the round. Here is a great tutorial on the knotions blog.

The "perfect" method for Vikkel braid in the round

What's that you say? You won't settle for anything less than perfect?

I understand. Perfectionism is an affliction that I too suffer from. So okay yes, there is still yet another method that looks absolutely perfect, but it involves cutting the yarn, which is not ideal in my opinion. This technique also works if you are working the braid with a new color of yarn (no modifications necessary).

Start by creating a knitted-on increase at the beginning of the round—you'll have one new stitch at the beginning of the round. Then, perform all the same maneuvers from steps 1-4 at the beginning of this post. Cut the yarn with an 8" tail. Drop the last stitch off of the right needle and pull on the dangling loop, elongating the loop until the tail comes through. Thread the tail onto a tapestry needle. Insert the needle tip behind both legs of the second braid stitch, then into the center of the last braid stitch, pull the yarn through. Adjust tensions on all the various loose ends until it looks perfect. You'll have two extra ends to weave in—was it worth it? Maybe.

There you have it—my compendium on the Vikkel braid in the round. I'd be remiss if I didn't mention another excellent method that I came across that uses an entirely different technique for creating the braid (I call this one the “k2tog method"). It certainly produces a sturdy looking braid, but it's a bit too bulky for my taste. You can learn more about that over on Wooly Wormhead's blog. If you have another favorite method, I'd love to hear about it in the comments below.

Thanks to Hudson & West Co. for providing the beautiful yarn for this post: Forge Worsted Weight 70% U.S. Merino / 30% U.S. Corriedale

Ladder Back Jacquard, where have you been all my life?

Many of the special hand knitting techniques that I have adopted over the years were discovered through desperate necessity. Late at night, absolutely exasperated and muttering to myself, “There's got to be a better way!" Then turning to Google or YouTube to compose a series of clumsy search queries.

Some of my favorite go-to methods were discovered like this—slip-knot cast on or the icelandic bind-off, for instance. Occasionally, this has lead to me “unventing" something unique, like my method for vertical stranding or 2-row jogless stripes in the round.

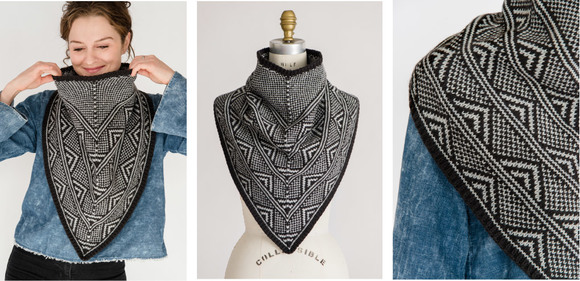
I recently found myself in a desperate moment like this while designing a colorwork motif for my new design, the Arquette Pullover. The Fair Isle motif requires a series of very long floats and the good ol' “Catch the Float" method just wasn't cutting it.

Enter, the Ladder Back Jacquard technique—a very cool method for invisibly managing long floats in stranded colorwork. I went on a deep-dive and learned everything I could. And now, I'm going to pass on my learnings in a long and rambling blog post. But if you'd rather just watch the video, this one's for you:


What is the Ladder Back Jacquard Method?

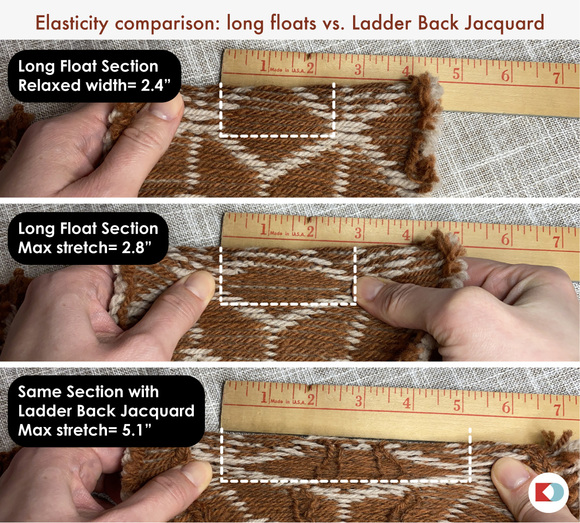
The Ladder Back Jacquard method is used in Fair Isle colorwork knitting to turn a series of long floats into a “ladder" of interlocking stitches on the back side. This neatly secures the floats and gives the piece impressive elasticity.

The term “jacquard" refers to any kind of fabric that has a layer of floats on the back. This method turns those floats into columns of stitches (ladders) that are only visible on the back side—hence, “Ladder Back Jacquard". It's actually a simplified version of double knitting.

Why would you use the Ladder Back Jacquard Method?

There are three related reasons why you would choose the Ladder Back Jacquard method to manage long floats in your color work—elasticity, tension, and stitch distortion.

1. Long floats are more susceptible to getting caught on things like fingers or jewelry. Snags can seriously distort the beautiful design that you've painstakingly knitted.

2. Also, it can be difficult to maintain a loose, even tension when managing long floats. If you aren't careful, your knitting may become tighter and tighter with every progressive row. This will cause puckering in your knitting and make it extremely in-elastic. To even out the puckering, you may have to stretch the floats in blocking which will cause the stitches to distort.

3. The longer your float is, the less elastic your knitting will become. If you need to stretch your knitted garment, like to get it over your head or ankle, you may end up pulling the long floats beyond their natural limit and distorting your motif. I've even heard of people accidentally tearing their colorwork because of this problem.


Ladder Back Jacquard Vs Catching Floats:

There is another much more common technique called “catching a float" or “trapping a float" that addresses some of these same problems, but it has drawbacks, especially if you're using it many times in one piece.

The catching floats method is not nearly as elastic as the Ladder Back Jacquard—it's about the same as doing nothing, in fact. It can be difficult to maintain a loose tension and it can still be slightly visible from the front side.

For these reasons I mainly use the “catching a float" method when I have an odd long float here or there within a fair Isle motif.

If you want to see my method for catching floats without getting your yarns in a tangle, check out my video.

How to Knit Ladder Back Jacquard

The Ladder Back Jacquard method is especially suited for sections of circular colorwork that have multiple rows of long-floats stacked on top of eachother or if there are especially long stretches between motifs that require carrying the unused yarn great distances (more than 10 stitches). Later in this post, I'll explain how to identify where to place the ladders.


Create the Initial Ladder Stitch:

a. Bring the main color to the front of your work first, then bring the float color to the front.

b. Do a M1L increase and...

c. Purl into the back loop with the float color. You can actually use any increasing method here, but I prefer either using the lifted increase or a M1L increase because they are invisible and anchor the ladder to the fabric.

d. Move both yarn strands to the back side at the same time.

This new stitch is the “Ladder Stitch". This extra stitch will live on your needle for all subsequent rows until you are done with the section that has long floats.


Continue the Ladder Pattern:

a. On the next row, work to the Ladder Stitch

b. Move the working yarn to the front of the work between the needle tips, then move the float color to the front, in that order. This keeps the ladder floating neatly behind the work. If you mess up the order it will be obvious after a row or two. You can fix it on a subsequent row by using a crochet hook to rework the layers.

c. Purl the Ladder Stitch with the float color.

d. Move both strands to the back of the work and continue working the motif as normal.


Continue working the ladder stitch on every row as described until the width of the float is 5 sts or less. I usually continue the ladder until the motif no longer requires a float in that column of stitches.


End the ladder:

a. On the next row, work to the ladder stitch.

b. Knit-2-together using the color indicated in your motif.

c. Continue working as normal. The ladder stitch should be invisible from the front side.


A few extra notes about the Ladder Back Jacquard technique:

  • • You can identify where you want to put your ladder stitch on the fly, but personally, I like to plan it ahead of time and mark my chart so that I don't get confused. You want to place your jacquard stitches so that you never have a float longer than 5 stitches, or 6 stitches max if you must. I've already done this work for you on the chart for my Arquette Pullover, which you can see below.
  • • You could do a knit stitch instead of a purl for your ladder stitch, but I think purling is easier and looks prettier on the back.
  • • The Ladder Back Jacquard technique is really best used when knitting circularly, but it is possible to perform all the same steps when working flat, just reverse everything when working the back (purl) side.
  • The Ladder Back Jacquard technique can enable you to knit intarsia motifs in the round, but this conversion is really only feasible if only 2 colors are used in one row.
  • • If your motif has many areas of long floats on every row, consider extending ladders beyond small sections to span the larger motif area. You could create an even mesh of ladders that covers the entire back side of your work. You would set up ladders evenly spaced—say 5 sts apart— on the first row of your work and then maintain all the ladders throughout, switching which color you knit the ladder with when the motif dictates a change, until you finish the last row of colorwork. On the back, the ladders would make long, tidy columns spanning all the way from top to bottom.


You can see this technique in action in my new knitting pattern, the Arquette Pullover, available on my site, my Payhip shop and Ravelry Shop. Using the Ladder Back Jacquard method is optional in this project, but I made it easy by including handy symbols on the color work chart to help you plan where to place the ladder stitches, which you can see pictured below.


I hope that you had fun learning and will incorporate the Ladder Back Jacquard method into your knitting projects.

Striving for the “perfect pattern" is the goal– the road to get there is often long, winding and fraught with frustration. At the end though, the satisfaction of the glorious finished sample and the perfectly elegant instructions of how to create it, it's simply sublime. The path that led to my newest pattern, the Vallo Cowl, is no different. Through many experiments, false starts, and a lot of head scratching, we got there!


I created the design concept about a year ago. I hardly remember making the first swatch. What I can recall, was that it was easy and I was very excited to bring this idea into the world. I shared my idea with Quince & Co. and they too were very excited to help me make the Vallo Cowl a reality.


Months roll by. I created samples and patterns for the *Leonarda Socks, the *Strozzi Cowl, the Motta Hat, and not the least of which, the Judd Pullover. Vallo waited patiently.

Finally, just before Christmas, it was Vallo's turn. I wound up the gorgeous Phoebe yarn from Quince and Co. and pulled up my chart files, ready to go! What I remembered was that it was practically done already. However, reality did not align with this recollection.

What ensued was a ridiculous perfectionist's fever dream. The cowl, as I had envisioned it originally and also how it is now, was constructed from the bottom up. I'm generally not a fan of bottom-up constructions, especially for items that may need length alterations. I became doggedly determined to recreate the design with a top-down approach.


Many nights went by where I knitted swatch after swatch, hours past bedtime, trying to perfect a top-down double central decrease in colorwork that approximated my original swatch. I bought patterns from other designers to research how they did it. No dice. I invented a new—and very unexplainable—way to create a double central increase. I was never satisfied.

Sometimes you just have to give up on an idea, even if it breaks your heart a little. Bottom up would have to do.

So, I went back to my original thought and knew that this time, I was on the true, easy-going path. I cast on all 270-odd stitches for the border and got to work.

Then the math problems started. I won't bore you with those details—this post is long enough, but suffice it to say that there was some frogging.

By New Year's Eve, I had managed to knit about half of the cowl. That's when I started to become aware of that annoying little perfectionist that lurks within me, again.

She would make snarky little comments from the corner of the room.

“Eww, that part isn't very pretty."
Or, “This is not your best work, Alexis."
Or even, “People want to knit something special. This isn't special."

With every passing row, she became increasingly difficult to ignore.

Deep sigh. She was right. I ripped back to the beginning once more so that I could create this dazzling little detail on the back of the cowl. The back SHOULD be as pretty as the front. It's little details like this that make hand knitting so special.


I will always be proud of my Vallo Cowl design and all the work that I put into creating it. In the end, the last iteration of the pattern was an absolute delight to knit. The momentum of the funnel shape made it impossible to put down. The colorwork was easy to memorize and engaging. The finished piece is so luxurious and soft in the Quince and Co. Phoebe yarn. It's fun to wear and easy to style. It will become a staple of my 3-season wardrobe, certainly.

I hope you'll pick up a copy of the **Vallo Cowl and see for yourself. I've offered an introductory discount for my newsletter subscribers (check your email!) which also includes a generous discount from Quince and Co.for the glorious Phoebe yarn.

*The fine print:
• Leonarda Socks and Strozzi cowl were exclusive to the Quince & Co subscription box until April 2022-- keep your eye out for the public release soon!

• I should also note, I am linking to my PayHip store because I get a greater percentage of sales from that platform for this particular pattern. If you would like to see what other knitters are doing with their projects, visit the Vallo Cowl Ravelry page, which is maintained by Quince & Co yarn company.

• First three photos and last photo: © 2022 Quince & Co; Photography: Regan Kenny


Today, I'm excited to launch a knitting pattern that is years in the making. It took a deadline and an intrepid group of test knitters to bring it into the world and I think you'll agree, it's worth the wait. The Judd Pullover, shown here in Purl Soho's Cashmere Merino Bloom yarn, combines all the best elements of my work—graphic motifs, addictive (knitting), and many small, special details that elevate the design beyond just a basic sweater and pattern.

The design features a large intarsia motif (perfect for newbies), modified drop shoulders, a vented hem, and a funnel neck with a lovely Vikkel braid detail. For more details about the construction of this garment and additional photos, visit the Judd pattern page here on Knit Darling.


The general concept for Judd has been kicking around in my head in one form or another for at least a couple of years, just waiting for the right moment. When that moment came, I was laying in bed pondering a serious problem—I didn't have any new sweaters to wear to the Rhinebeck Sheep and Wool Festival, only about a month away. Inspiration struck, as it often does at inconvenient moments, and I suddenly knew the time had come to create this glorious sweater. I quickly sat up to turn on the light and grab the closest thing I could find to a piece of paper—an old envelope—and furiously began sketching. And, Judd was born.


The next day, I refined my sketches and began researching yarn options. I quickly settled on a most luxurious yarn called Cashmere Merino Bloom from Purl Soho. Within a couple of days, the yarn arrived and I got to work. With only one month to go, there was no time to lose.


I managed to knit the sample and write the pattern all in 3 weeks, which is pretty darn fast for me. I finished and photographed the sample with only a few days to spare before the festival. I felt triumphant and so proud to wear my new creation.


Pictured here at the New York State Sheep and Wool Festival (AKA Rhinebeck): @kehleycovi @woodsyandwild @emilywools @alexiswinslow @emilygreeneknits


Immediately after the festival, I sent the pattern out for tech editing and organized a test knitting group. The process of editing and test knitting is so incredibly valuable to the end result of the pattern. It was almost unbearable to set the publish date in 2022, but with every improvement I made through the testing process, I grew even prouder of this pattern.

Here are some of the beautiful finished test knits and the wonderful knitters who helped me with the test:

PurlsPurlsPurls • Psherman • Biggreenboots
Audephil • hopeupchurch616 • EmilyWools

I can't thank these brave knitters enough for generously lending their talents and time to my project over the past few months—a spectacular bunch, indeed! They've helped me take this pattern to the next level. It's probably my best written pattern to date, thanks to them.

The yarn I chose for the sample is Purl Soho's Cashmere Merino Bloom. This yarn is so incredibly soft—it's like wearing a hug. It was easy to work with and tolerated a little ripping out and reworking well. I didn't find any clumps of fiber in my hand as I knitted, which makes me think this yarn will resist pilling to some degree–the destiny of many soft, fuzzy yarns in my experience.


It's difficult to fully capture the coziness of the yarn in photos so you'll just have to trust me. Or, maybe you can trust the look of pure joy on my toddler's face, pictured here as he thoroughly snuggles this sweater. He loves anything soft and just can't resist a good cuddle.

It was quite hard for me to pick colors, especially because this yarn is offered in such a gorgeous palette. I settled on a monochrome color combo because most of my wardrobe is black or neutral. Purl Soho just released an extension to the colors they offer for this yarn line including a particularly gorgeous color called Warm Honey, which I am already scheming to use for an upcoming project.

To help knitters imagine the possibilities, I included a coloring page in the pattern, along with yardage estimates for each little section of color in case you want to really mix things up. Please, have some fun with this! :)


I hope you've enjoyed learning a little background about this design. I'm so excited to share this pattern with the world. The pattern is available here on KnitDarling, Ravelry and Payhip for $9 USD. I'm offering the pattern at 15% off for the first week with the code GETJUDD—hurry to get your copy now!
(Offer expires Jan. 27, 2022 at midnight ET)

I'm so happy to announce the release of my new knitting pattern, the Motta Hat. The pattern pdf is available here on my website and also at Quince and Co for $7.00 US.

The design is full of fun knitterly details– bold stranded colorwork, popcorn texture and Vikkel braids. Top off your hat with an optional pompom– or don't, because the colorwork on the crown shaping is extra pretty, too! The pattern includes links to tutorials for all the special techniques, making this project accessible to knitters at every skill level.

When I initially designed this hat, it was part of a submission for the Quince Quarterly subscription box. They ended up selecting two different designs from that submission—the Strozzi Cowl and the Leonarda Socks, which won't be publicly available until April 2022 (but you can peep them on the Quince site here and here). Thankfully, Quince didn't want to let this hat design go, so they commissioned it separately. I'm so glad they did because it was one of my favorite designs from the bunch. Below is my original design sketch from that submission:

I really loved this initial sketch, but when it came time to add the giant pom pom that I had proposed, I just couldn't do it. I spent a lot of time perfecting the crown shaping. Below are some test swatches I did while I was working out the design. I'm pretty proud of how it turned out. I definitely regret not getting a nice photo of the top before attaching the pom pom, but you can see glimpses of it in some of these photos. It absolutely pained me to hide all that hard work under a silly pom pom, as much as I love them.

Even so, a wee pom was made, and set atop the hat, only covering a small portion of the crown motif. I do love how it balances the contrasting color of the brim so nicely, so it really couldn't be skipped.

The motif has a great rhythm to it that is really fun to knit. I had been kicking this motif around for a while before I landed on this hat design. I briefly thought it would make a cute baby sweater, maybe with some extra colors, perhaps with some cool Spincycle Yarn as the contrast? I even developed the motif a little further and submitted it to another yarn company (Hudson + West Co.) as a sweater, but without all the textured stitches. They ended up choosing a different design from my submission-- the Kuffel Pullover-- which is one of my all time favorites, so no hard feelings there :) You can see how those two designs kind of jive.

The gorgeous yarn, Chickadee, of course is from Quince & Co and pictured here in Honey, Petal and Slate. I absolutely adore this yarn! It's very soft and warm and it drapes well, perfect for a hat. I also love all the colors that this yarn comes in-- you could hardly go wrong with that palette! I would love to knit another one in an inverse colorway, perhaps with the background and brim in darker Gingerbread and the foreground in Camel. I've been really into warm earth tones lately.

I really hope you'll pick up a copy of the Motta Hat knitting pattern! With all those details, a fun time is guaranteed! If you cast on, please post some pictures on Ravelry. I'd love to see what everyone is working on.

Photo credit for first and sixth images: Regan Kenny © 2021 Quince & C