
Alternating Cable Cast-On & Bind-Off: Beautiful Edges for 1×1 Ribbing
I love a knitting technique that delivers a beautiful result without a lot of fuss. The alternating cable cast-on and bind-off are two of my favorites for exactly that reason.
Both create a neat, almost invisible edge that follows the natural structure of 1×1 ribbing. The knit and purl columns seem to wrap around the edge of the fabric, giving it a polished finish similar in appearance to a tubular (Italian) cast-on or bind-off, but with far fewer steps.
They also have a nice balance of stretch and structure, making them particularly lovely for sweater cuffs, necklines, and hat brims. They work with both regular and twisted ribbing, too.
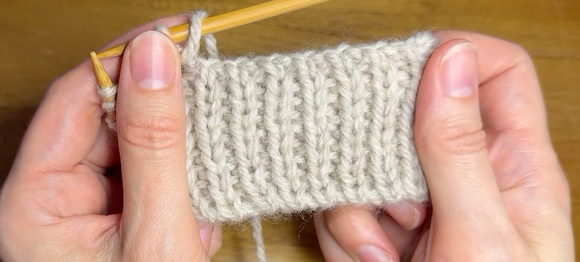
Alternating Cable Cast-On
The alternating cable cast-on is worked much like a traditional cable cast-on, except that you alternate between forming knit and purl stitches. There's also a small twist added to each stitch as it's transferred to the left needle, which is optional (more on that below).
Watch the video above for a step-by-step visual tutorial.
How to work it
Setup: Make a slip knot on the left needle (counts as a purl stitch). Knit into the slip knot without dropping it, then transfer the new stitch to the left needle by inserting the left needle into its front leg from right to left, twisting the stitch.
Purl cast-on: Insert the right needle between the first two stitches on the left needle, from back to front. Wrap the yarn and pull through a loop. Transfer the new stitch to the left needle with the same twisting motion.
Knit cast-on: Insert the right needle between the first two stitches, from front to back. Wrap the yarn and pull through a loop. Transfer the new stitch to the left needle, twisting as before.
Repeat the purl and knit cast-on stitches until you have the desired number.
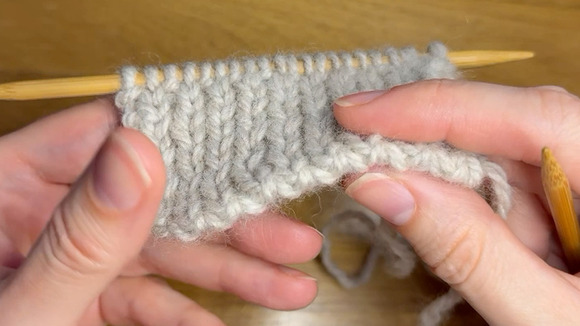
Tips for a beautiful finish
It's easy to lose track of the sequence, so check your stitches every 10–20 stitches. The knit stitches sit forward, while the purl stitches recede slightly.
If you lose your place, look at the working yarn: if it emerges from the back of the last stitch, cast on a purl next. If it emerges from the front, cast on a knit. You can see this demonstrated at 6:02 in the video.
Working in the round? For a cleaner join, work one row of 1×1 ribbing flat before joining. When weaving in your cast-on tail, use it to close the small gap, mimicking the path of the neighboring stitches. This finishing technique is demonstrated at 8:13.
Why twist the stitches? When you transfer the newly cast-on stitch from the right to the left needle, these instructions include a little twist. However, you may transfer the stitch without a twist. I've tried it both ways, and while the end results appear almost identical, I prefer the twisted version. It looks slightly rounder, feels more stable as I'm working it, and seems to spring back into shape a little better after being stretched.
Alternating Cable Bind-Off
The matching alternating cable bind-off creates a similarly tidy edge, with the knit columns extending right up to the edge and appearing to curl around to the back.
The trick is to purl the knit stitches and knit the purl stitches, while wrapping the working yarn around the base of the previous stitch rather than moving it directly between the needle tips.
I demonstrate two methods in the video below. Both produce the same result.
Method 1: Wrap Around the Needle
This method is easier to understand at first, but requires a straight or double-pointed needle in the right hand. Throughout the bind-off, you'll knit the purls and purl the knits, as if working seed stitch.
-
Work the opposite of the first stitch presented (knit a purl, or purl a knit).
-
To prepare for the next stitch, move the working yarn around to the opposite side by wrapping it around the right side of the stitch just worked and under the right-hand needle, instead of between the needle tips.
-
Work the next stitch in the opposite pattern as a seed stitch and pass the previous stitch over to bind off.
-
Continue across the row.
Watch the demonstration at 1:21.
Method 2: Slip, Switch, Slip
This is my preferred method because it has a much smoother rhythm. It's also well suited to circular needles and continental knitting. Set up by working the first stitch opposite as it presents (purl a knit or knit a purl).
-
Slip: Return the stitch on the right needle to the left needle.
-
Switch: Move the working yarn between the needle tips to prepare for the next stitch.
-
Slip: Return the stitch to the right needle.
-
Work: Knit the next purl stitch or purl the next knit stitch.
-
Bind off: Pass the previous stitch over the new stitch.
Repeat: Slip, switch, slip, work, bind off.
Watch the demonstration at 4:18.
A note about stretch
The alternating cable bind-off has a decent amount of stretch, though it isn't the stretchiest bind-off out there—again, similar to the Italian bind-off. What I particularly like is that it has enough structure and spring to keep edges looking neat, rather than loose or sloppy. It's a great choice when you want your ribbing to hold its shape.
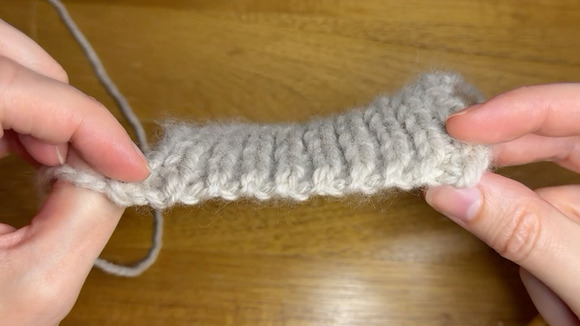
A Beautifully Matched Pair
These two techniques look especially lovely together, but they're just as useful individually. The simplest details can make the biggest difference in a finished knitting project, and a thoughtfully chosen edge is one of them.
Give them a try on your next project! If you have any questions, feel free to leave a comment on the YouTube videos, reach out through my website's contact form, or find me on Instagram.