When I was a young girl growing up in Oklahoma, my parents loved to take me and my brother on road trips to New Mexico to visit Santa Fe or Taos. This was a marvelous contrast from my ordinary suburban life — seeing a different culture, pueblo pottery and Navajo rug weaving, and most importantly a glimpse of the New Mexico art scene. This is when I first became aware of Georia O'Keeffe, and first had an inkling that I wanted to be an artist when I grew up.
The Okeeffe Shawl from my new book, Homage, honors this amazing woman and her influence on my life. Georgia O'Keeffe (1897-1986) has been called the “Mother of American Modernism", and is famous for her paintings of enlarged flowers and New Mexico landscapes, and her radical feminist views (for the time). But to me, she was an inspiring pioneer, blazing a path for little girls with big dreams like me.
This project definitely took some twists and turns. I started out with a completely different design actually. It was still a shawl, but it featured some rather intense geometric lacework. I was having some trouble settling into the design, and put off starting it for an absurd period of time. I procrastinated to the point where I would have to push back my book's publish date if I waited any longer. Mainly, I was struggling to find the right yarn in the colors I wanted, and was resisting compromise.
Around that same time I had the pleasure of meeting Alice O'Reilly, the amazingly talented dyer of Backyard Fiberworks. I took a look at her yarn line, and discovered that it included some fabulous gradient kits and colors that I had not previously seen before. This sparked an idea for me—I asked Alice if she would be interested in collaborating on a palette for one of her kits that I could use for my new shawl design. We began texting back and forth, and in no time I had this beautiful yarn in my hands.
The design changed quite a bit in the process, and in the end it reminded me of the rolling hills in an O'Keeffe painting. Alice suggested that we expand the concept into a limited edition line of O'Keeffe inspired yarn kits for the book launch party.
The palette for the sample pictured is called Pedernal after Gorgia O'Keeffe's painting by the same name.
This shawl was so much fun to knit! There is something about it that just begs you to keep going. I could hardly believe how fast I got to the end. I used a special technique called the Icelandic Bind-Off, which makes a beautiful, super-stretchy edge for garter stitch. It's pretty easy to do (instructions), but I made a video to fully demonstrate the technique, and linked to it in the pattern pdf.
The pattern is part of my book, Homage (Knit Darling Book 2), but I'm also selling it individually here on my website and on Ravelry for $6.00. It's finally perfect shawl knitting weather, so I hope you'll pick up a copy!
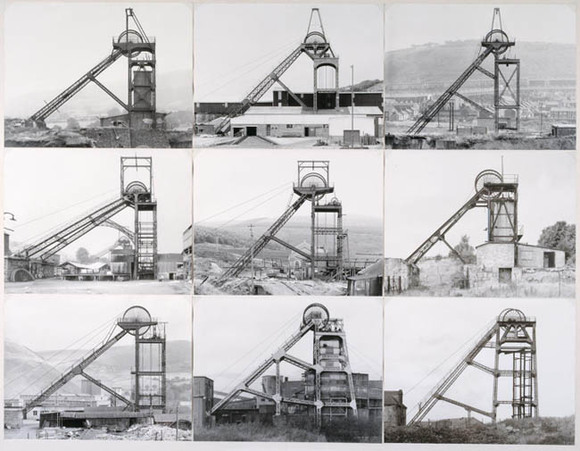
Time for some art history, yay! All the patterns from my new book, Homage, honor a different pioneering female artist from history. This design honors Hilla Becher (1934-2015), conceptual artist and photographer. The Hilla Hat design reflects Becher's most famous works—a series of gelatin silver printed photographs depicting industrial architecture arranged into a grid. Becher's work has influenced generations of photographers, and has impacted Minimalism and Conceptual Art since the 1970's.
Almost like collage, Becher arranged her photographs depicting similar objects to create motifs of repeating structures. The arrangements make her otherwise straightforward photos quite visually interesting. However, as a conceptual artist, Becher's work is rife with meaning and should not be considered merely decorative. Becher's presentation of her work pits objectivity against subjectivity, depicting a pattern of sequential experiences that is connected in a network.
Though her message was more about the human experience and the evolving/decaying characteristics of nature, I rather liked this idea as it relates to a knitting pattern, repeated endlessly with slight variations, and also more specifically as it relates to the process of creating knitted fabric that is composed of a single strand of yarn. Also, in the broader context of my book, which is all about gratitude for my predecessors and my followers, I love the idea that I am forever connected to the knitters who make my designs through our shared experience of creating the same object.
On a less conceptual level, this adorable hat is my new favorite accessory! I've already knitted it 3 times, and I might go for a fourth soon. The hat features an easy geometric Fair Isle motif and a wide brim that can be folded up for extra warmth, or left down for a slouchy look. The pattern is part of my book, Homage, but I'm also offering it as an individual pdf.
If you want to learn more about Hilla Becher, check out the links below:
The Vikkel Braid, also called a Lateral Braid, or Estonian Braid, produces a beautiful decorative braid effect. It's gorgeous, the only problem is that if you're working in the round, it leaves a pretty hideous jog at the beginning/end of the round.
I've used this method many times in my design work and each time I have tweaked my instructions slightly to deal with the jog problem. I recently used this technique on my Arquette Pullover to add a decorative border at the bottom of the neckline ribbing. After some small nudges from my pattern test knitting group, I decided to once and for all settle the issue.
I researched dozens of methods and did a *ridiculous* number of practice swatches to come up with the perfect mash-up of techniques. I'm going to demonstrate a few methods for working the Vikkel braid in the round without a jog (!)—an “easier method", a “harder method", and a modification to make them both work if you are doing the braid in a different color than the row below. I'm also throwing in the holy grail perfect method, but I'm telling you it's probably not worth it (but maybe it is).
If you're more of a video person, you're in luck. Check out my abbreviated video below, which describes both methods and the 2-color mod.
Before we can talk about how to deal with the jog, I should explain the basic technique for creating the Vikkel braid, which works either flat or in the round.
How to work the Vikkel Braid Stitch:
1. Switch to smaller needles – about 4 sizes smaller. The resulting stitches after working the braid tend to become extremely loose. The smaller needle keeps this in check
2. Work a “Braid Stitch" as follows:
a. Skip the first stitch, tilt the work forward slightly, knit into the back loop of the second stitch—do not drop the stitch;
b. Knit into the front loop of the first stitch
c. Drop both sts from the left needle.
d. Slip the last st on the right needle to the left.
3. Repeat step 2 to the end of the round but don't slip the last stitch over to the left needle. 4. Work either method below to close the braid.
Joining the Braid—Method 1:
(The Easier Method)
This is a very tidy join, and probably all you really need. Work the Vikkel braid instructions to the end of the round, but don't slip the last stitch back to the left needle
a. Identify the first braid stitch;
b. Insert the right needle behind the first braid from the top to the bottom;
c. Lift first braid stitch onto left needle;
d. Knit into the back loops of the braid stitch treating both legs as one. —1 st increase
e. Eliminate the new stitch by passing the second stitch on the right needle over the first.
You may switch back to the original size needles as you work the next round.
Joining the Braid: Method 2
(The Harder Method)
This is truly an almost perfect join, but it involves a crochet hook which adds a slight layer of complexity. Just as with Method 1, work the Vikkel braid to the end of the round, but do not slip the last stitch back to the left needle.
a. Insert a crochet hook (similar size to needle) behind both legs of the first braid from top to bottom.
b.Turn the hook counter-clockwise so that the hook aligns with the left needle; hook the first stitch on the right needle;
c. pull the stitch off of the needle;
d. Pull the loop all the way through the braid stitch
e. Place the stitch on the left needle and remove the crochet hook.
f. Insert crochet hook through the top leg of the last braid stitch from top to bottom;
g. Hook the first st on the right needle and
h. Pull the loop through the last braid stitch; place the st on the right needle.
You may switch back to the original size needles as you work the next round.
Vikkel braid in the round with a new color:
Work either the “easier method" or the" harder method" above, but at the beginning, knit 1 st with the new color, then replace the stitch just worked back onto the left needle before proceeding with the instructions as written. This will leave a tiny gap below the braid, but it's hardly noticeable.
If you want to knit the braid as a stripe of contrasting color, there is yet another special technique that requires working both colors across the round. Here is a great tutorial on the knotions blog.
The "perfect" method for Vikkel braid in the round
What's that you say? You won't settle for anything less than perfect?
I understand. Perfectionism is an affliction that I too suffer from. So okay yes, there is still yet another method that looks absolutely perfect, but it involves cutting the yarn, which is not ideal in my opinion. This technique also works if you are working the braid with a new color of yarn (no modifications necessary).
Start by creating a knitted-on increase at the beginning of the round—you'll have one new stitch at the beginning of the round. Then, perform all the same maneuvers from steps 1-4 at the beginning of this post. Cut the yarn with an 8" tail. Drop the last stitch off of the right needle and pull on the dangling loop, elongating the loop until the tail comes through. Thread the tail onto a tapestry needle. Insert the needle tip behind both legs of the second braid stitch, then into the center of the last braid stitch, pull the yarn through. Adjust tensions on all the various loose ends until it looks perfect. You'll have two extra ends to weave in—was it worth it? Maybe.
There you have it—my compendium on the Vikkel braid in the round. I'd be remiss if I didn't mention another excellent method that I came across that uses an entirely different technique for creating the braid (I call this one the “k2tog method"). It certainly produces a sturdy looking braid, but it's a bit too bulky for my taste. You can learn more about that over on Wooly Wormhead's blog. If you have another favorite method, I'd love to hear about it in the comments below.