I'm so excited because my new knitting pattern, the East Hale Cardigan, just came out in the fall 2011 issue of Knitscene Magazine! It's a men's zippered cardigan with a classic casual style.
I just uploaded a design demo video for the pattern, check it out
It's my first men's pattern to publish, and I'm not sure what to expect. I'm just dying to hear what you all think, so please leave a comment below!
It's been a busy week around here! I announced the lucky winner of my first twitter contest over on my other website, alexiswinslow.com. Congrats to @Saschaguinn who will be receiving a free print of my painting, Thunderhead. For everyone else who entered, I have a special offer for you too!
I also had the pleasure of being interviewed by Deborah over at Interrobang Knits for her series, "Knitters You Should Know". It was a fun interview and she asked some really great questions. You should all go check out her site because Deborah is a great writer and she's got some neat stuff going on over there.
[caption id="attachment_689" align="alignnone" width="459" caption="Screenshot from Interrobang Knits Site"][/caption]
I've also been busy working on the big re-design of Knitdarling.com! I'm so very excited to share the new design with you all and it pains me so very much that it's taking so very long to get it launched! It's been only a year and a half since the initial launch of Knitdarling, but it seems I've totally outgrown this old site. Most notably, the new site will feature a new home for the video series I have started. Also, in the next year I'll be doubling my patterns for sale, so I'll be adding a list of categories to make my patterns easier to sort through.
Since the gallery space is pretty much by appointment only, I'm trying something new that is inspired by my other "extra" career selling printed knitting patterns. I'm offering a variety of high quality prints of the paintings on display. By selling prints, I can reach more of the folks that appreciate my work, but maybe can't afford to drop a grand+ on one piece.
To kick off my new venture, I'm announcing a twitter contest! You could win your very own 24" x 16" print of "Thunderhead", pictured below. All you have to do is follow me on twitter and RT my announcement . I'll announce the winner on Friday, July 1st, 2011. You can go here for more info and to see who won.
Imagine a print of this painting hanging over your couch! All your friends would think you're so cool!
If you are interested in buying a print (prices start at $45), check out this price list for the pieces I've included, or you can contact me directly. Also, I would just love you forever if you could help spread the word, by sharing this on Facebook!
Let me know what you think of my new idea by commenting below. Thanks everyone, and good luck with the contest!
I'd like to share my way of knitting more successful 2-row jogless stripes in the round. Watch the video and read the post, because both give valuable info on the topic:
First off, manage your expectations:
Knitting jogless stripes in the round is one of those age-old problems that never seems to be totally resolved. Circular knitting is actually knitting in a spiral, not a circle, making a totally jogless stripe impossible. With every tip or trick you find, there will always be something not quite right where you join the new color.
I did some research and found many different methods for use on stripes with 2+ rows per stripe. I tried a few, and settled on the simplest because it can easily be inserted into any written pattern.
The "Slip 1" method: Knit one round with the new color, then slip (purlwise) the first stitch of the 2nd round.
Short and sweet? More like mangled and ugly:
It's so elegant, right? Just slip one stitch and all your problems go away! Hooray! And yes, I thought it worked well enough at first, but as with most things in knitting, it turns out a bit of finesse is necessary.
I started out using the "Slip 1" technique on a garment with wide stripes, and I was pretty happy. The jog was much less noticeable. Feeling empowered, I then decided to use it on a design I had been working on that involved a series of 2-row stripes. The result was much less successful. The "Slip 1" method looked worse than the jog on my narrow 2-row stripes.
With narrow 2-row stripes, the "Slip 1" technique will distort your knitting into a disgusting mess that you wish you never saw! The problem is that the stripes are too close together and the beginning of each stripe is pulled down further than normal by the previous stripe of that color. AND, since it only deals with one end of the jog, the top of the stripe still ends with a little stair-step down to the new color.
After a lot of head scratching, and really screwing up a mitten, I figured out some tips that take the "Slip 1" method to the next level.
My trick, "Tug & Twist":
It is important to always twist the two colors together at the beginning of every round. Do this by always picking-up the new color from around the back of the old color. The name of the game is tension control. When you twist the colors together like this, a twisted cord will form on the backside of your work that will help keep extra slack or extra tension in check.
As you begin the first row of the new color, take the new color of yarn in your hand and give it a bit of a tug. Tug hard enough to significantly tighten the last stitch of the previous stripe of this color. Then twist the new color together around the old color as mentioned before. Knit the first stitch of the row loosely, making sure there is plenty of slack in the “twisted cord”. The “cord” should sort of lock the shrunken stitch into place while allowing extra slack for that first loose stitch. Knit the rest of the round normally. Then slip the first stitch of the second round, as explained before. Repeat for each color change.
This should do it! Just twist at the start of each round, and tug that last stitch so it shrinks. You can adapt "tug and twist" to use on wider stripes too. Just "tug" the last stitch of the stripe after you've worked the first round or two of the new color, and remember to still "twist" before every round.
I hope you've found this helpful! Please leave a comment to tell me what you think or if you know of any other tricks to make a better “jogless” stripe.
Worsted-Knitt.net just posted my interview, so please go check it out! It was a fun interview because Lumia asked some really great questions. While you're there, you should also check out the cute hand-made stitch markers, patterns, and knitting themed t-shirts she's got for sale.
In this video post I talk about my Gowanus Shawl pattern. A great project for Memorial Day weekend! It's light and summery, and taking only 1 skein of 50g fingering weight yarn on size 9 needles, it's a cinch to make. For more info, check out my blog post, Gowanus = SuperFUN, and the Gowanus Shawl pattern page.
Let me know what you think by leaving a comment below!
This is the first of a series where I plan to do a demo video for each of my new designs. In this video post, I talk about my Figurehead Shawl pattern that was recently published in Knitscene Magazine, Summer 2011 issue. I discuss my inspiration, yarn, design elements and show what it looks like on a real person.
I hope you enjoy! Please leave some comments below to tell me what you think.
I'm so beyond delighted to announce the debut of my new pattern, the Figurehead Shawl, in the new KnitScene Summer 2011 magazine! I'm extra excited because it's the first pattern I've gotten published in a magazine. Whoo hoo!
The pattern is a small summery shawl style scarf featuring a [totally knitted] scalloped edge and a cute little button to make sure it stays put. It's great if you need just a little extra layer on a breezy summer afternoon. The striped pattern is so easy and adds a handsome touch to the simple garter stitch texture. I love it because not only is it super cute, but also because I know it won't slip off my neck, which makes it the perfect little scarf to wear while riding my bike.
Did I sell you all on it yet? Yes! Now giddy-up! Go buy that magazine and knit, knit, KNIT!
[caption id="attachment_524" align="alignnone" width="468" caption="The pages of the magazine splayed out for all you internetters to see. Also, check out my orchid in the back. I kept that thing around for 2 years and it finally bloomed again!"][/caption]
It was such a surreal experience to see something that I made on a model with my name next to it in a magazine. The pictures look so good too! They didn't get a picture showing the button, which is my favorite part of the pattern, but you can see it here.
The magazine hit the shelves a week ago. I've already started seeing some project pictures pop up on the pattern's Ravelry page, which is always a delight. Keep up the good work everyone!
FYI, you can purchase the magazine online or just about anywhere that sells knitting magazines (like a craft store or Barnes & Noble).
This weekend I went with my darling mother to the SOFA (sculpture objects & functional art) show at the Park Avenue Armory on 67th Street. I REALLY enjoyed this show. There were so many things that were right up my alley! In addition to painting, I've always had a keen interest in ceramics and pottery. In art school I had a dual concentration on both, but didn't really pursue the pottery thing after college. Honestly I was only OK at it, and painting was clearly my strong suit, but still there was always something about clay that just made my heart sing :)
Here are some pictures of some of my favorite work from the show.
I absolutely loved these ceramic faces by Johan Thunell. If you look closely (they are smaller than you'd think, maybe 6" tall), you'll see that he's only glazed the teeth and eyes, giving these pieces a creepy, yet charming glimmer of life.
This piece, by Marian Bijlenga, was another favorite of mine. It spoke to my inner textile artist I think. I've made several forays into the field, but have never really found my voice. I think there's still a future there though.
Left: a beaded heart by Jan Huling, who we met at the show and is a charming woman. Right: a collection of enchanting dolls by Charla Khanna.
Left, back: some striking pots by Per Weiss. I'm always impressed by giant pots! The figurative work in both pictures is by Lars Calmer. There's something I really liked about these. They reminded me of some of my artist friends from Oklahoma.
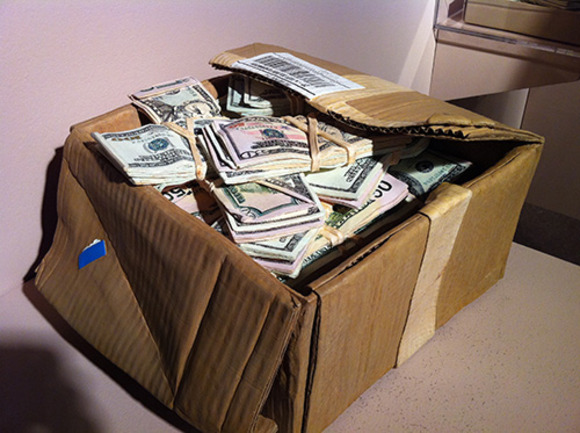
This super realistic box of money by Randall Rosenthal was carved from a single block of wood!
Another notable artist was Joan Rasmussen who had some really fascinating little dolls made from ceramics and found objects. I also really enjoyed the intricate baskets displayed at the Tai Gallery booth.
They reminded me of the cover to my high school calculus book (left). The piece on the right, by Honda Syoryu, is representative of the work I saw. Do you see what I mean?
[caption id="attachment_489" align="alignleft" width="260" caption="The Snood for Good!"][/caption]
Just a quick note today. I've been ULTRA busy lately (tell you why soon), but it's about time I post about my fundraiser for relief efforts in Japan. It was such a huge success! Thanks to everyone who bought my "Caring Cowl" pattern, I was able to donate $200 to the American Red Cross. I also want to thank everyone who re-blogged, tweeted, and posted on facebook and Ravelry about the pattern. Every time that happened I had a bump in sales and I really appreciated your help in spreading the word. You're the best!
This was such a great experience that I've decided to continue selling the pattern, donating the profits to charity. Thanks again everyone! I'll be sure to keep you posted about future donations.



 [/caption]


 [/caption]