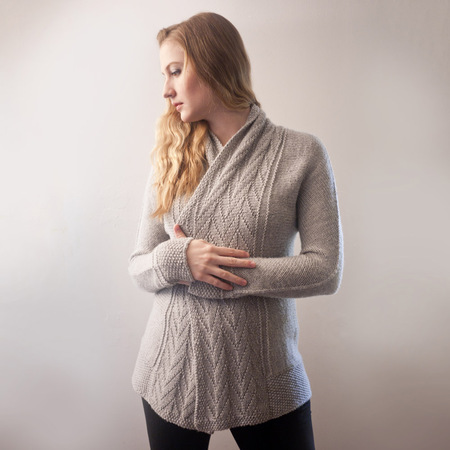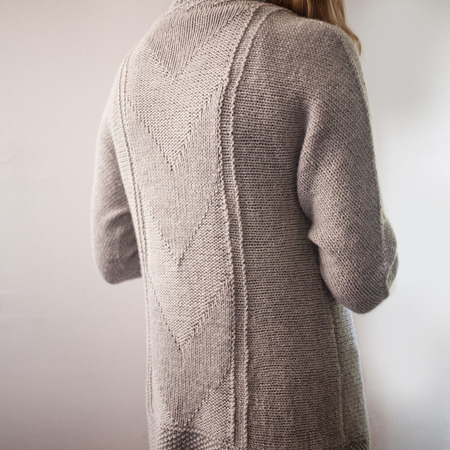


This long elegant cardigan has a very unusual construction, that is as entertaining to knit as it is a fun to figure out. The sweater is worked in every which direction; bottom-up, top-down, sideways and diagonally, for a completely seamless garment. The design has a contemporary silhouette with a modified dolman sleeve and features an open front with a generous drapey full length collar, diagonally knitted arms with a raised seam-stitch running from shoulder-top to wrist, and seed-stitch edgings all around. Flattering for curvy and straight figures alike, the optional hip shaping makes this garment easy to fit to your body type.
Bust: 32 (36, 40, 44, 48, 52, 56)”, Hip: 36 (40, 44, 48, 52, 56, 60)”
The cardigan pictured is a size 36 bust; garment is meant to be worn with 0” to 2” of ease.
total length: 27 (27.25, 27.5, 27.75, 28.25, 28.5, 28.5)”
*See the notes below for tips on how to adjust the length.
Knitpicks Swish DK 100% superwash wool, [50g/123y]- 9 (10, 10, 12, 12, 13, 14) balls
Size 9 US 36” circular needle and set of double-pointed needles
Size 11 US needle for 3-needle bind-off.
Stitch markers.
Stitch holder or waste yarn
Yarn needle
16.25 sts and 26 rows in stockinette and seed-stitch. Swatch measurements are taken after blocking. Use the same blocking method you intend to use on the garment, i.e. wet block or steam block.
• IN FIRST EDITION OF THE PRINTED BOOK, AND DIGITAL PATTERNS PURCHASED BEFORE MARCH 5, 2013:
Second part of Chevron pattern should read: ‘knit to end of row’ instead of ‘purl’
• IN FIRST EDITION OF THE PRINTED BOOK, AND CURRENT DIGITAL PATTERNS SOLD THROUGH KNITPICKS ONLY:
Optional hip shaping Row 13: knit instead of purl.
The sk2p is mis-typed in the Key. Should read: S2KP- Double decrease: slip 2 stitches together as if to knit two together, knit the next stitch, pass the two slipped stitches over the tip of your needle.
Row 11 of the Embossed Chevron Stitch Pattern Chart should have a dot in the first column.
• IN CURRENT PRINTED AND DIGITAL VERSIONS SOLD THROUGH RAVELRY, DEEP SOUTH FIBERS, AND KNITDARLING.COM (PATTERN VERSION P1):
Under the Abbreviations list, the description for Sl should read “slip 1 st from left needle to right”
Q: I see the yarn is DK weight, so why is the gauge for a worsted or Aran weight yarn?
A: I thought a lot about the gauge, and made a mountain of swatches before deciding on this particular needle/yarn combination. It’s knitted with just one strand of DK yarn which produces a slightly open gauge. The looser gauge makes for a lighter sweater that drapes nicely and can be worn into the spring. Also, there’s a lot of fabric around the neck, and the slightly looser knit helps it feel less bulky.
Q: With no shoulder seam, how do I know how long to make the sleeve?
A: The sleeves are knitted in a bias fabric, which paired with the looser gauge, makes them very stretchy. The top-down construction of the sleeves allows for easy length adjustment though, and I encourage you to try on the sweater to determine the appropriate length for you.
Q: How do I adjust the length of the cardigan?
A: Because of it’s unusual construction, the sweater pattern directions are for one length only, but it’s not difficult to figure out even drastic adjustments. You will first need to determine the length that you want the sweater. I recommend measuring one of your favorite cardigans that you already wear all the time. Measure right down the center from the back of the neck to the lower edge. Let’s just say that the length you want is 5″ shorter than the cardigan in the pattern. You will need to make the following adjustments:
(I have underlined all the numbers that you will need to change below)
1. Figure out about how many stitches is in 5″ using the gauge measurement. In this case, it is about 20 stitches. You’ll use this number again and again, so make a note of it.
2. Center Back Panel: Repeat the Chevron Panel Pattern until the piece measures 5″ short of what the pattern says for your size.
3. The Right Panel:
a. You begin this section by picking up stitches along the side of the Center Back Panel, then you will cast-on stitches for the front. It is a very long row because the front and back are worked at the same time. Since your Center Back Panel is5″ shorter, pick-up 20 less stitches than what is stated in the pattern, then subtract 20 from the number of stitches you cast-on. Your total number of stitches will be 40 (that’s 20+20) less than what the pattern states.
b. Optional Hip Shaping: only Row 7 is effected by the length adjustment. Work as described to the wrapped stitch, then subtract 20 stitches from directions before the slipped stitch.
c. The Next Row after the hip shaping: Subtract 20 from the first number.
4. Shoulder Shaping: Subtract 20 from the first number in the “Set-up Row”. All the stitch totals will be 40 (that’s 20+20) stitches less than what the pattern states. The length adjustment is taken from the sides, and does not effect the center shoulder/sleeve section.
5. Left Panel and Sleeve: Subtract 20 from the number of stitches cast-on, then subtract another 20 from the stitches you pick-up. The total number of stitches will be 40 (that’s 20+20) stitches less than what is stated in the pattern.
6. Front Edging: You will begin this section by picking up stitches along the front edges of the cardigan. Since the main body section is 5″ shorter, you will need to pick-up 20 fewer stitches on both sides. The total stitch count will be 40less than what is stated in the pattern. I designed the front edging to include a small seed stitch border along the edges. You will need to calculate how many “Embossed Chevron Stitch” pattern repeats you can fit over the entire row, adding about 4-8 stitches of seed stitch to each side to make a nice border.