Knitted Covered Button Tutorial
Recently, I needed a button for a new cardigan I knitted for an upcoming Brooklyn Tweed Wool People collection (sorry, no pictures allowed yet). The button needed to be sort of plain, because the design is very clean and modern, but also compliment the warm coziness of the BT Loft yarn I used. Of course, I have some of the very best button stores at my disposal here in NYC, but why bother when I have the power to make the perfect button, right here in my living room?!

If you've never made covered buttons before, you've been missing out. It's kind of amazing because they open up a whole new world of interesting button possibilities--including of course, hand-knitted buttons.
Covered buttons are especially great for using with lightweight hand knits that require larger buttons. Big heavy buttons can pull on delicate hand knits and distort them over time. I learned this the hard way, of course, so I'm very sensitive to gravity's effects. Covered buttons are pretty much hollow, making them more lightweight than standard plastic buttons. This is exactly what I needed for my BT cardigan.
As I created my buttons, I thought this is just the kind of thing my Knit Darling readers would love to learn about! I’ve made a great number of covered buttons over the years, so I have a lot of knowledge I can share. Before I get into the instructions though, I have a few things you should consider.
ONE
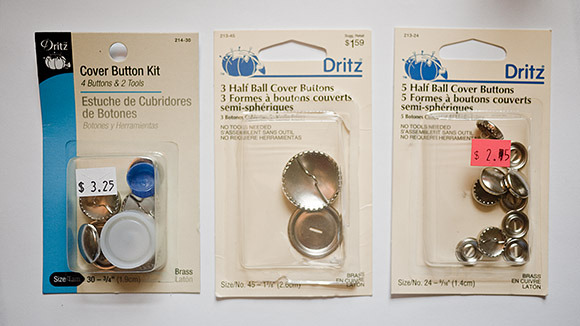
I’ve never successfully made a tiny knitted covered button. Because of this, I suggest you use a medium to large sized covered button kit. I like to use the kind of covered buttons that feature comb-like teeth on the underside because they are perfect for grabbing the edges of knitted fabric. I've used Dritz brand half-ball covered button kits with great results.
TWO
Select a very lightweight yarn–fingering weight works best. Most covered button kits are designed to be used with thin woven fabrics. Thicker yarn doesn't work because it prevents the back plate from snapping into place properly.

THREE
Use a smaller needle than suggested to create a very dense fabric. This is more of an aesthetic thing. The piece of fabric you knit has to stretch over the shiny metal button, and any little gaps between your stitches will become very obvious. I always use size 0 needles.
FOUR
Contrary to the kit instructions, make your knitted piece only barely larger than the button itself. This will reduce bulk inside the button, which will make snapping the cover into place much easier. Again, the kits are designed to be used with woven fabrics that fray near the cut edges. We won't have that problem with our custom made knitted covers, so ignore the pattern on the back if the package.

INSTRUCTIONS
You will be making a little octagon that is just big enough to wrap around the top if the button. You might like to measure the button to determine this size, but I've also done pretty well just estimating it as I go.
Cast-on about 4-8 stitches, depending on the size of your button (about 1/3 the width of the button). Begin knitting the piece in whatever stitch you like, and cast-on one extra stitch at the end of every single row until the piece becomes a little wider than the button itself. At this point, it should be about 1/3 of the total length that you need. Now, knit straight without shaping until the piece is about 2/3 of the total length that you need. Then, begin decreasing one stitch at the beginning of every row until the piece is the right length and bind-off.

ASSEMBLE THE BUTTON
Look at your knitted piece and determine if the fabric is dense enough to hide the shiny button to your liking. If not, it's okay to paint the button with a matching color (use nail polish, acrylic paint, or enamel spray paint).

Now, place the knitted fabric with the right-side facing down on a table. Position the top of the button, rounded side down over the fabric. Pull a bit of the fabric around to the back so it catches in the teeth. Take a bit of fabric from the opposite edge and stretch it so it catches on the teeth on the other side. You want the fabric to be tight across the top of the button, but not stressed, if that makes sense. Make adjustments to center the fabric now, because it becomes practically impossible later.

Continue attaching small bits of fabric from opposite sides until the fabric is completely secured. Trim the ends about 1/8" from the fabric.
Then, the only thing left to do is snap the back cover plate into place. Refer to the package to see which side is "up" on the back plate. This maneuver is always a little tricky, and occasionally I find it necessary to employ a hammer, but usually I can just use the edge of a table to press the plate into place.

Of course, there are lots of opportunities to get creative with your covered buttons. Try different stitch patterns or stripes. I think it could also look cool to paint the button cover a contrasting color, and let that show through a lace stitch pattern.

Do you have any cool ideas, or maybe some tips of your own? Please share in the comments section below!
Comments
-

Carrie Williams
almost 12 years agoNever would have thought! Will try on current project although a bulky varigated yarn have also got same colour combination in fine yarn. Learn and share some great stuff online. (Including English/Australian spelling and knitting jargon eg. . Binding off/casting off.) Carrie
-

Aasny
almost 12 years agoWhen I couldn't find buttons to match a project I was working on, I ended up turning to Dorset buttons. http://www.threadsmagazine.com/item/32711/get-creative-with-heirloom-buttons/page/all After some robust cursing, something "clicked" and I was able to understand the instructions.
-

Alexis Winslow
almost 12 years agoAasny, Thanks for sharing that tutorial! I've never tried Dorset buttons, but they are certainly beautiful. I will have to keep that technique in mind next time I need a button. -Alexis
-

Averal
almost 12 years agoI usually crochet mine and stuff them with kapok or toy filling----- NO COST WHATSOEVER and most of the time we have enough yarn left--- SO. A perfect match
-
Alexis Winslow
almost 12 years agoThanks for your comment Averal, I haven't tried that technique. Do the buttons come out like little balls?
-

Carol
almost 12 years agoThanks for this tutorial. I am often stuck for buttons on finished projects. Never seem to find the right size WITH the right colour! I most definitely will be trying this in future. I also like the look of the nail varnish'ed button. Do you know if the varnish would peel over time? Carol
-
Alexis Winslow
almost 12 years agoCarol- Thanks for your comment! The nail polish does look cool on the buttons! It's super smooth and glossy. I'm unsure how the uncovered nail polish would fare over time though. I've only ever covered it up!
-

Ann
almost 12 years agoI have knit buttons using basically these same techniques. There's a couple things that I think should be pointed out: 1st if you use the metal buttons that are in a "kit" ... the ones you have pictured are really the only ones that work. Two reasons, (as you pointed out), the teeth are really helpful AND the shank is attached to the top of the button going thru the bottom plate, (because they won't pull apart with normal wear pressure. Also, if the back pops off the button after being sewn on the garment it will remain intact.) The other important thing is somehow getting rid of the metal shine that shows thru the knit. I've spray painted them with Epoxy paint to dull them or even add some interest but I like your nail polish idea.
-

aly
almost 12 years agoI make tweed bags to sell at Celtic Festivals. I bought the kit sewology from Hobby Lobby but it won't do heavy material like tweed. I see that you make these using dritz - so you think tweed would work with it? Thanks Aly mudandthread.com
-

Lynn Stanbra
almost 12 years agoAny chance you could post the pattern for the cabled button? It would be perfect for an afghan I'm making!
-

Sarah Runnacles
almost 4 years agoSo happy to have found this- I often cover buttons for sewing projects, but love the look of a knitted button. Going to give it a go! Thanks!