Recently, I needed a button for a new cardigan I knitted for an upcoming Brooklyn Tweed Wool People collection (sorry, no pictures allowed yet). The button needed to be sort of plain, because the design is very clean and modern, but also compliment the warm coziness of the BT Loft yarn I used. Of course, I have some of the very best button stores at my disposal here in NYC, but why bother when I have the power to make the perfect button, right here in my living room?!

KnitDarling-Knitted-Covered-Button1

If you've never made covered buttons before, you've been missing out. It's kind of amazing because they open up a whole new world of interesting button possibilities--including of course, hand-knitted buttons.

Covered buttons are especially great for using with lightweight hand knits that require larger buttons. Big heavy buttons can pull on delicate hand knits and distort them over time. I learned this the hard way, of course, so I'm very sensitive to gravity's effects. Covered buttons are pretty much hollow, making them more lightweight than standard plastic buttons. This is exactly what I needed for my BT cardigan.

As I created my buttons, I thought this is just the kind of thing my Knit Darling readers would love to learn about! I’ve made a great number of covered buttons over the years, so I have a lot of knowledge I can share. Before I get into the instructions though, I have a few things you should consider.
KnitDarling-Knitted-Covered-Button2

ONE
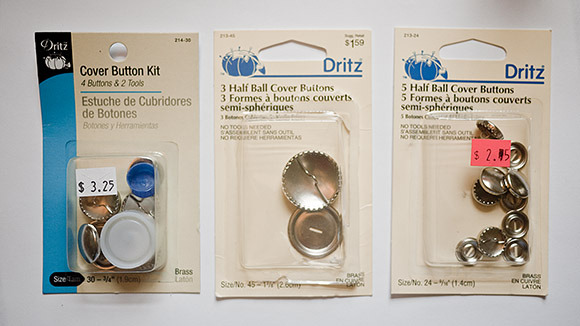
I’ve never successfully made a tiny knitted covered button. Because of this, I suggest you use a medium to large sized covered button kit. I like to use the kind of covered buttons that feature comb-like teeth on the underside because they are perfect for grabbing the edges of knitted fabric. I've used Dritz brand half-ball covered button kits with great results.

TWO
Select a very lightweight yarn–fingering weight works best. Most covered button kits are designed to be used with thin woven fabrics. Thicker yarn doesn't work because it prevents the back plate from snapping into place properly.

KnitDarling-Knitted-Covered-Button3

THREE
Use a smaller needle than suggested to create a very dense fabric. This is more of an aesthetic thing. The piece of fabric you knit has to stretch over the shiny metal button, and any little gaps between your stitches will become very obvious. I always use size 0 needles.

FOUR
Contrary to the kit instructions, make your knitted piece only barely larger than the button itself. This will reduce bulk inside the button, which will make snapping the cover into place much easier. Again, the kits are designed to be used with woven fabrics that fray near the cut edges. We won't have that problem with our custom made knitted covers, so ignore the pattern on the back if the package.

KnitDarling-Knitted-Covered-Button4

INSTRUCTIONS
You will be making a little octagon that is just big enough to wrap around the top if the button. You might like to measure the button to determine this size, but I've also done pretty well just estimating it as I go.

Cast-on about 4-8 stitches, depending on the size of your button (about 1/3 the width of the button). Begin knitting the piece in whatever stitch you like, and cast-on one extra stitch at the end of every single row until the piece becomes a little wider than the button itself. At this point, it should be about 1/3 of the total length that you need. Now, knit straight without shaping until the piece is about 2/3 of the total length that you need. Then, begin decreasing one stitch at the beginning of every row until the piece is the right length and bind-off.

KnitDarling-Knitted-Covered-Button5

ASSEMBLE THE BUTTON
Look at your knitted piece and determine if the fabric is dense enough to hide the shiny button to your liking. If not, it's okay to paint the button with a matching color (use nail polish, acrylic paint, or enamel spray paint).

KnitDarling-Knitted-Covered-Button6

Now, place the knitted fabric with the right-side facing down on a table. Position the top of the button, rounded side down over the fabric. Pull a bit of the fabric around to the back so it catches in the teeth. Take a bit of fabric from the opposite edge and stretch it so it catches on the teeth on the other side. You want the fabric to be tight across the top of the button, but not stressed, if that makes sense. Make adjustments to center the fabric now, because it becomes practically impossible later.

KnitDarling-Knitted-Covered-Button7

Continue attaching small bits of fabric from opposite sides until the fabric is completely secured. Trim the ends about 1/8" from the fabric.

Then, the only thing left to do is snap the back cover plate into place. Refer to the package to see which side is "up" on the back plate. This maneuver is always a little tricky, and occasionally I find it necessary to employ a hammer, but usually I can just use the edge of a table to press the plate into place.

KnitDarling-Knitted-Covered-Button8

Of course, there are lots of opportunities to get creative with your covered buttons. Try different stitch patterns or stripes. I think it could also look cool to paint the button cover a contrasting color, and let that show through a lace stitch pattern.

KnitDarling-Knitted-Covered-Button9

Do you have any cool ideas, or maybe some tips of your own? Please share in the comments section below!


Jul 1, 2014

Since I finished writing the manuscript for my book, I've been trying to use my extra time to expand my skills. I've had a lot of fun doing so many different things like video production, web design, and even exercise (I've been working up to doing a push-up, and somehow discovered that I like running- nobody saw that coming, especially me!).

I've been all over the place doing things that have very little to do with knitting, but last weekend I brought it home (a little) by taking a two-day intensive machine knitting class at the Textile Arts Center.

KnitDarling-MachineKnitted-Lace

The class was taught by Mandy Kordal, who has her very own beautiful independent knitwear line. She taught us 3 cast-on techniques, how to make eyelets, some simple shaping techniques, and a few different ways to bind-off. By the end of the class, everyone had made a simple slouchy beanie. Here's mine:

KnitDarling-MachineKnitted-Hat

I used two strands of yarn knitted together to get a marled effect. Here's what it looked like right before I "casted-off":

KnitDarling-MachineKnitted-Hat-InProgress

Of course knitting by machine is very different from hand knitting, but I was definitely able to apply my design skills. I have to admit, sailing through a 100 stitch row of stockinette in about 2 seconds was pretty exhilarating. I couldn't help myself when I saw we had some extra time at the end of class, and I whipped up this simple top.

KnitDarling-MachineKnitted-Top

I think owning a knitting machine would be pretty useful because I could quickly test out unusual shapes for my knitting patterns. But the machines are pretty expensive, so unless I find time to produce and sell my knitted items, I'm not sure it makes sense to buy one. If I ever saw one for cheap at a garage sale though, I would snatch it up in a heartbeat!

Have you ever owned a knitting machine? Did you use it much?

Jun 23, 2014

As a creative and curious person, I'm always trying to figure out how things work. That's why I design knitwear, why love learning about quantum mechanics, and why I spend so much time watching video tutorials on the internet.

How websites work has always been a bit if a mystery to me. I have to admit, the Internet seems like a magical place. I don't actually believe there's a genie in my laptop named Safari, but the web still delights and impresses me on a daily basis.

I'm very fortunate that Brian, my web-developer husband, has always taken care of my website needs. But lately, I've been curious to find out for myself what makes my website GO. As a first step I'm learning a bit about front-end web development, starting with HTML code and CSS design.

KnitDarling-Code-KDIt's been interesting, and not surprisingly, the more I learn the more I feel like I'm using my knitting pattern design muscles. I'm organizing information, using special abbreviations, and formatting elements in a way that reminds me of writing a knitting pattern.

I became curious about this stuff because I'm currently in the process of designing a shiny new website for Knit Darling. The process has gone something like this for me:
*design a few things, consult with Brian, find out that I'm crazy, go back to the drawing board, repeat from * until (what seems like) forever. Needless to say, I think more like a painter than a programmer! KnitDarling-NewSitePreview-KD

I'm under no illusion that I will soon have the skills to code any of my new website design for real, but I'm starting to understand how it all works together. So maybe I'll have a few less of those "repeats" in my future!


For those of you that love being first in line, I'm excited to announce that my book, Graphic Knits, is now available for pre-order! Both Interweave and Amazon.com have posted the book for sale on their sites. 

Pre-order sales are very important for authors because those numbers are what drive big orders from large retailers. Of course big orders mean a bigger audience, so I hope you'll check out my book and order yours today!

business-cards-KD

Even though the release won't be until September, I'm really starting to feel the excitement! I just received a big box of business cards, and I can hardly wait to get out there and start meeting new knitters.

I'm going to start organizing a blog tour for the book soon, so I'd love to know what your favorite knitting blogs and podcasts are. Please share in the comments below!

If you read my last post, you know why it's useful to possess a variety of knitting needles made from different materials. With that in mind, the folks at Knitter's Pride have generously offered a deluxe set of their interchangeable Karbonz Needles for me to give away to one lucky knitter!

KarbonzDeluxeIC copy

But wait, there's more!
In addition to that, I'm also doing a pattern giveaway for three of my favorite patterns: Delancey Cardigan (regular or plus-size), Brewster Pullover or my Rosendale Slouchy Hat.

Knitdarling-Delancey-Giveaway

Here's how to enter: 
Leave a comment on this post telling me which is your favorite pattern from the list above. Please share this post because the more people that comment, the more patterns I will give away :)

The grand prize will receive the Karbonz needle set, and all three patterns. Runner-ups will receive the pattern mentioned in their comment.

One entry per person, please. I will email winners next weekend (March 23, 2014), so keep an eye on your inbox!

PS
If you're a fan of free patterns (and who isn't?!), you'll love this new thing I'm doing with my email list. For anyone who signs up, I will send you a free copy of my Cabled Dad Hat pattern as a thank you gift (just for a limited time). The sign-up form is in the right column of my website.

Cabled-Dad-Hat3


NOTE: COMMENTS HAVE BEEN CLOSED FOR THIS POST

Recently, I got a new carbon fiber interchangeable needle set (Karbonz from Knitter's Pride). As you can imagine, I already have an extensive needle collection, so you might ask why I need a yet another set. The short answer? Gauge.

Each of my needle sets are made from a different material, which can affect both stitch and row gauge. I was curious how I would knit with my new needle set, so I designed an experiment.

I began with a ball of 100% wool yarn (Knit Picks Wool of the Andes Worsted) and 4 sets of size 7 needles, all made from different materials:

1. Plastic Resin: Denise Interchangeable Needle Set
2. Wooden: Knit Picks Harmony Needle Set
3. Metal: Addi Turbos
4. Carbon Fiber: my new Karbonz Interchangeable Needles

I knitted up a stockinette swatch (30 sts x 45 rows) with each needle type, then blocked them all very, very carefully to be sure they weren't stretched.

Knit-Darling-Needles-Gauge-Swatches

After the swatches dried and kind of mellowed out for a while, I took careful gauge measurements. Then I used the results to figure the dimensions for an average sized sweater that is 200 sts wide and 150 rows tall.

I was shocked!

The results really surprised me: if I knitted a sweater with one kind of needle versus another, I would have about a 2" variation in either width or length. That's a big difference!

Knit-Darling-Needles-Gauge-01

I was also curious about differences in my "flat vs. circular" gauge because I've had trouble with sleeves not matching the sweater they are attached to. So I got to work on a circular swatch with my wooden dpns.

Results? There is a difference, of course. If I knitted my 200 st x 150 row sweater with a circular construction, it would come out 1.5" narrower than if I knitted it flat with the same wooden needles. Surprisingly, the row gauge was unaffected.

So what's the take-away from all this?
While your results would certainly vary from mine, I think it's important to be aware of how your tools can affect your finished objects and to use this knowledge to your advantage:
1. Knit your gauge swatch with the same needles you plan to knit the garment with.
2. Knit circular swatches for circular garments.
3. The more stitches in a row, the more a difference in gauge affects the finished measurements of the garment.
4. If you need to connect a circular-knitted sleeve to a flat-knitted body, make a separate circular gauge swatch. If you knit like I do, you might need to go up a needle size or switch to a needle made from a different material to get the correct gauge.
5. And for goodness sake, make large gauge swatches! (6"+ is a good rule of thumb)

I hope you found this post informative! I know I will probably reference it often in the future. I'd love to hear what you think in the comments section below.

AND, If you haven't seen Homage: Knit Darling Book 2 book yet, go check it out! The collection features 5 gorgeous new knitting patterns inspired by Modernist art and design, each piece honoring a different pioneering female artist from history. I could not be prouder of the collection!

Meet Brewster. She's entirely seamless, knitted from the top-down, striped, fair isle'd--an all around modern beauty (in my humble opinion). The PDF pattern with integrated video content is now available in my shop for sizes 31"-52". More details here...

Brewster-5-KD

I was inspired to design this immediately after I finished writing the manuscript for my forthcoming book. Why didn't I want to take a break, you ask? Well, because I'm a little crazy I guess. Actually, I've been thinking about this design for almost a year. Brewster has a very unusual seamless-top-down-set-in sleeve/shoulder construction (worked kind of like a yoke) that I developed for one of the patterns in my book. I loved it so much, that I couldn't wait to try it out again.

Brewster-6-KD

I've seen a few similar yoke-esque seamless-top-down-set-in sleeve designs, but they all seemed to have a sort of faux seam on the top of the shoulder that I didn't like. If you know my design work, you know that I am a big fan of a particular type of shoulder construction where the seam falls slightly over the back of the shoulder. So I took that style of shoulder and figured out how to work it from the top down and also include the sleeve caps–all at the same time. The result is not only a really beautiful silhouette, but also a very entertaining thing to knit. And since there are no seams to sew, the set-in sleeve is pretty much fail proof.

Brewster-3-KD

Another thing I'm excited about is the integrated video content that I have included in the pattern PDF. I've been creating tons of new video tutorials so I found a way to link to my videos inside my patterns. The videos cover some of the skills that most patterns gloss over–things like blocking or how to pick up stitches. My goal with this is to make my patterns more accessible to knitters who aren't confident that they have the necessary skills. I'm really excited to offer this kind of content in my patterns, and I'd love to hear what you think about it.

I'd also love to hear what you think about the overall design in the comments below. What colors would you choose for your Brewster?

Just a quick note today about my Caring Cowl fundraiser for ARC's Disaster Relief Fund: With everyone's help, I was able to raise almost $400 from sales of my Caring Cowl pattern!

Thanks to everyone for helping me get the word out about my little fundraiser. I will keep my Caring Cowl pattern up for sale and continue to donate all profits to The American Red Cross. Donation-Confirmation-pic2

As many of you know, philanthropy is very important to me. As a proud member (and cofounder!) of the charitable giving site CharitySub.org, I am able to help a huge variety of causes with just $5 a month. If you haven't checked it out yet, please take a minute to see if CharitySub is a good fit for you too.

Alexis with sign

Are you wondering what to give that special knitter in your life? For the outsider, it can seem impossible to pick the perfect gift for someone who knits, but don't worry! I'm here to help.

Gift-Guide-Pic1

In my last gift guide, I shared some really great ideas for knitting gifts, and all of those things are still relevant, but this year I want to take my guide to another level. These gifts will inspire, motivate, and excite the knitter who receives them.

EXPERIENCES


If your recipient is like me, they've got just about every knitting do-dad they need. So what knitting related gift would I love to get?

1. Workshop at a Local Yarn Shop- Most yarn shops offer classes and workshops for all skill levels. You can call your local yarn shop to see what's available, or if you're unsure, you can get a gift certificate that covers the cost of a class. The recipient can also use the gift certificate for yarn, so it's impossible to go wrong with this one! Click the link to find a yarn shop in your area.

2. A Craftsy.com Class- Craftsy.com is a website that offers online classes and products for all sorts of different crafts. This link will lead you to a page where you can purchase a class for your recipient that they can choose later. It's great because you can select a date in the future (like Christmas) for your gift to arrive in their inbox.

3. Tickets To a Knitting Event- This is a gift idea that can be simple, or elaborate. There are all kinds of events that knitters love to attend, from local fiber festivals to national sock knitting conferences. There are even knitting cruises that sail to exotic tropical locations! An amazing gift (in my opinion), would be to arrange a trip to a Vogue Knitting Live event. The gift could include a 2-day pass to the event, a plane ticket to the city it's being held in, and a hotel near the event. I would squeal if I got this gift.

SUPPLIES


The ideas above are very thoughtful, but maybe you're looking for something more tangible than an emailed gift certificate or a trip itinerary. Knitting is a wonderful hobby because you really need very little equipment to get started. But once initiated, there are endless gadgets and supplies that make it so much more fun.

1. A Pattern Book- There are always new books coming out, and I love filling my library with new sources of inspiration. MY book isn't coming out until September, so in the meantime here are some of my favorites that have been recently published:
• Scarf Style 2 by Ann Budd: This is a great book for gifting because it has projects for every skill level and style. Full disclosure, my design is the one on the cover!
• Metropolitan Knits by Melissa Wehrle: This book is full of contemporary, sophisticated knitwear. The author, Melissa Wehrle is also one of my favorite designers.
• Knitting Architecture by Tanis Gray: This book has a little bit of everything. The styles are all interesting and wearable.
Also, if your recipient has a favorite knitwear designer, try to find their latest book and arrange to get a signed copy.

2. A Stocking Full of Knitting Supplies- This is a fun idea that I would love to get. You could fill a stocking with all kinds of little things. Here's some ideas that you can get online or at a local yarn shop:
• A little bottle of Eucalan Wool Wash- I tear through this stuff!
• Some yarn (usually 2 balls is safe for a small project)
• $20 gift certificate to a local yarn shop
• Stitch Markers- I don't know where they all go (I'm looking at you, vacuum cleaner...)
• A Cute Measuring Tape
• A Yarn Cutter Pendant- This is great for knitters that travel.
• A Netflix subscription- I love to watch movies and knit.
• A Knitting Periodical- They sell knitting magazines at most major bookstores. You can attach a note saying that you also got her a subscription. My favorites are KnitScene and Interweave Knits.

3. Subscription to HollaKnits- I wasn't sure where to put this in my post, but it's definitely worth including. HollaKnits is like a knitting magazine subscription, but it's all in a digital format. The patterns are all created by indie knitwear designers and have a very hip aesthetic. The creator of HollaKnits, Allyson Dykhuizen, is doing some really cool things with this new format.

Do you have some of your own ideas that other readers would find helpful? Please share in the comment section below!

Once again, I'm dedicating all the sales from my Caring Cowl pattern to the Red Cross to benefit victims of the devastating Typhoon in the Philippines. In addition, if you help me spread the word, I will send you a free pattern of your choice (any from my Rav Store). *details at the end.

New_cowl_medium2-KDThe Caring Cowl ($3.00) is a quick fun knit that makes a great holiday gift. The pattern is easy enough for beginners, but still manages to be entertaining, not to mention ultra hip!

Check back here to see updates about the progress of the fundraiser. The last Caring Cowl fundraiser was so successful; I know we can do it again!

** Please help me spread the word about my fundraiser! If you tweet, post on Facebook, or include a link to Caring Cowl or this post on your blog, I would love to send you a free pattern from my Ravelry Store. All you have to do is comment below with a link to your mention and don't forget to mention your pattern choice. Thanks again!