I have a TON of trunk shows, knit-alongs, and blog appearances planned from now until the end of 2014. I hope you'll stop by as many as you can to see what all the fuss is about!

THE SCHEDULE

Graphic Knits Book Reviews:

9/14 - The Knit Girllls Video Podcast
9/18 - Knitting Daily Blog
10/06 - Alex Tinsley on Dull Roar
10/27 - Hand Made by Stefanie

Interviews:

9/15 - Sweatshop of Love
9/16 - Tanis Knits
10/09 - Planet Purl
10/16 - Neo Knits
10/30 - A Verb For Keeping Warm - interview planned
11/14 - Berroco Blog

Graphic Knits KAL's:

9/19 - Knit DarlingSweetness Pullover
10/3 - Heather Zoppetti DesignsWoodstar Mitts
10/7 - Dayana KnitsLaszlo Cardigan
10/9 - Knitscene/Knitting Daily blogBarbet Turtleneck
10/9 - Stockinette Zombies – Megan will knit Germander Shrug and Amy will make Sweetness Pullover
10/16 - Polka Dot OverloadBowerbird Wrap

Trunk Show and Book Signing Events:

10/11- Brooklyn, NY La Casita Yarn Shop during NYC yarn crawl 2-5pm
10/18 - Rhinebeck, NY – New York Sheep & Wool Festival 10am-5pm
10/19 - Rhinebeck, NY – New York Sheep & Wool Festival 10am-5pm
10/26 - Vancouver, BC – Urban Yarns // book signing & trunk show (time tbd)
11/1 - Portland, OR – Knit Purl // book signing & trunk show (time tbd)
11/14 - San Francisco, CA ImagiKnit // book signing & trunk show 4pm
11/16 - Oakland/Berkely, CA – A Verb for Keeping Warm // Book signing & trunk show 3-5pm
12/22 - Norman, OK – L&B Yarn Company // book signing & trunk show 6-8pm

(this post will be updated if events times/places change)

Announcing plans for the Sweetness Pullover knit-along! The Sweetness Pullover is one of my favorite designs from my new book Graphic Knits, and I'm so excited to make one for myself!

If you've never knitted a sweater before, the Sweetness Pullover is an excellent place to start. Any beginner sweater knitter would probably have to learn a few new skills, but don't worry because I'll be with you all the way!

Some of the more intermediate level skills in the pattern are circular knitting, a small section of short-row shaping to raise the back if the collar (that's completely optional, actually), fair isle knitting, picking up stitches, and blocking your finished garment. All these skills are incorporated one at a time, in a very straightforward way, so there's absolutely nothing to be scared of. Also, I have created video tutorials for each of these skills that you can watch over and over if you're nervous ;)

The KAL will be broken up into 6 parts from September 19 to November 17, at a nice leisurely pace. Feel free to step it up and work ahead in the pattern though!

As a prize, all participants in my Ravelry group who finish their sweater by the deadline will get their choice of one free Knit Darling pattern. I will also have a grand prize that includes some fabulous yarn from my gigantic stash and a signed copy of my Winsome Knits booklet from Knit Picks.

Participants can post pictures via Ravelry or Instagram, and I will share some of my favorites here on my blog as we go along.

The Graphic Knits book that contains the Sweetness Pullover pattern is available in paperback and as an instant PDF download. If you want the paperback check your local yarn shop, or order now so you have the pattern in time to start!

THE DETAILS
KAL begins September 19 and ends November 17 (my birthday!) Of course late joiners are also welcome, but you must finish the sweater and post a picture by the end date to be eligible to win.

Prize winners will be selected from Ravelry participants, but you can also join the fun on Instagram with hashtag #sweetnessKAL.

Ravelry Info: Join KnitDarling's Ravelry Group and share your work in progress (WIP) pictures in the Sweetness KAL thread.

Instagram Info: follow @alexiswinslow and share your progress pics with the hashtag #sweetnessKAL .

Here's another pic of the sample from the book for a little inspiration.

I'm so excited to get started! I hope to see everyone over in my Ravelry group soon.

Minnow was the very first pattern I wrote for my book, Graphic Knits.

The simple act of beginning the book was an incredibly daunting thing. It was September 2012, and I had just finished my Winsome Knits collection for Knit Picks. I had about 11 months to produce 20 more new patterns and the corresponding samples. I was basically freaking out.

The proposal process was stressful, but Interweave's wonderful acquisitions editor, Allison Korleski guided me through every step. After my proposal was accepted and I signed my contract, it took an excruciating 5 weeks before Interweave assigned an editor to my book.

Based on my experience with Allison, I had a lot of assumptions about my editor's roll in the book. I assumed that once I had an editor she would become very involved; this was my very first book, after all. I'm not sure why, but I thought a close author/editor relationship was essential. I thought I needed my editor's permission to start the Work. Every passing day was excruciating because I knew my deadline was already next to impossible. All I wanted to do was BEGIN. It soon became clear I was going to have to figure it out on my own.

My book proposal contained about 30 designs and I figured I could choose anything I wanted for the required 20. Looking it over, I divided my designs into a list of "definitely's and maybe's." The next step was ordering yarn. I had zero contacts in the yarn biz, but I did have a favorite yarn company, Blue Sky Alpacas. I decided to start there.

About a year prior, one of my design proposals made it into Ann Budd's book, Scarf Style 2. When Ann ordered my yarn, she CC'd me on the email she sent to the yarn company. I remember thinking how casually she asked for free yarn, kind of like "Hey Mr. Yarn-Guy, we haven't met but please send a bunch of free yarn to this unknown designer. Kthxbye." I thought, wow! What confidence! I could be like that.

So with this in mind, I visited Blue Sky Alpacas' website and filled out the "contact" form to introduce myself and to ask for yarn support. They responded quickly and I felt empowered. Soon, boxes and boxes of yarn were arriving on my doorstep, and I began working away on my very first pattern, Minnow.

I chose to begin with Minnow partially because I thought it wouldn't give me much trouble design-wise, and partially because I just could not wait to dig into that delicious Blue Sky Alpacas Metalico yarn. The name Minnow was inspired by the beautiful texture of the yarn. It's called Metalico, but it really has more of a pearly glow than a hard metallic shine. It's silvery luster reminded me of the little minnow fish. It made me think of the giant minnow tanks inside the gas stations near my childhood home in Oklahoma. In that area, the gas stations all carried fishing bait because they were near a lake. I would peer into the dark swirling minnow tanks to kill time while my parents chatted up the shopkeepers.

The design for Minnow was actually inspired by another one of my patterns, the Westfalia Scarf, which I had just completed for Winsome Knits. If you look at that design, you'll notice that the eyelet motif is very similar.

For some reason, certain stitch patterns are just more entertaining and relaxing to knit than others, and this is one of those stitch patterns. The stitch seemed kind of like an old friend that I was very glad to see again.

Every time I look at Minnow, I think about the all fun I had knitting it, but also all the emotion tied up in that period of time. It's funny how knits can do that. We spend so much time with our projects in our hands that they each become woven into life's experiences.

I hope you'll pick up a copy of the book and create your own memories! For more info, check out the pattern page here.

Sep 7, 2014

Graphic Knits is my new book from Interweave Press that hits the shelves in just a few weeks (available for pre-order here) . The book, with 20 exciting new garment and accessory patterns, is the pinnacle of my design career and I couldn’t be more proud to share it with the world!

The process from start to finish took just over 2 years, and consumed most of my waking/non-day-job-working hours. If you've ever wondered what it's like to write a knitting book, you're in luck. Over the coming weeks I will tell-all, divulging everything I wasn't supposed to talk about from start to finish. I will introduce each design from the book here on my blog, talk about my life during the design process, discuss inspiration, show sketches, and finally share all the difficulties and the triumphs I encountered on the way.

To kick off my blog campaign, I'm running a YouTube contest! Check out my video below, and comment for a chance to win a free signed copy of Graphic Knits. Comment here on my blog AND on YouTube to double your chances of winning!

Contest Rules:
One comment per person at KnitDarling.com AND at YouTube.com. Contest ends September 30th, 2014. The winner will be contacted via their profile on YouTube or via the information provided in the comment form at KnitDarling.com.

Update: Winner Announced
Anita Nauman won a signed copy of the book and a couple extra bonus patterns.

Recently, I needed a button for a new cardigan I knitted for an upcoming Brooklyn Tweed Wool People collection (sorry, no pictures allowed yet). The button needed to be sort of plain, because the design is very clean and modern, but also compliment the warm coziness of the BT Loft yarn I used. Of course, I have some of the very best button stores at my disposal here in NYC, but why bother when I have the power to make the perfect button, right here in my living room?!

KnitDarling-Knitted-Covered-Button1

If you've never made covered buttons before, you've been missing out. It's kind of amazing because they open up a whole new world of interesting button possibilities--including of course, hand-knitted buttons.

Covered buttons are especially great for using with lightweight hand knits that require larger buttons. Big heavy buttons can pull on delicate hand knits and distort them over time. I learned this the hard way, of course, so I'm very sensitive to gravity's effects. Covered buttons are pretty much hollow, making them more lightweight than standard plastic buttons. This is exactly what I needed for my BT cardigan.

As I created my buttons, I thought this is just the kind of thing my Knit Darling readers would love to learn about! I’ve made a great number of covered buttons over the years, so I have a lot of knowledge I can share. Before I get into the instructions though, I have a few things you should consider.

KnitDarling-Knitted-Covered-Button2

ONE
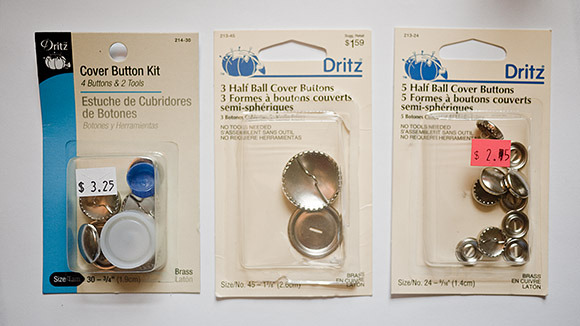
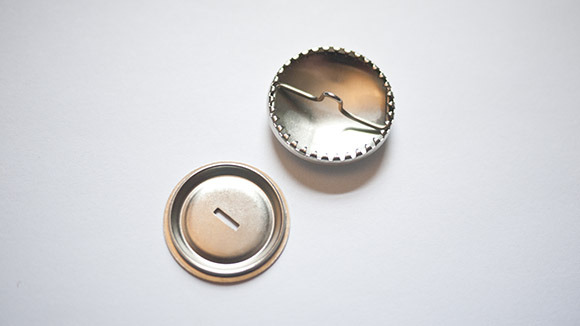
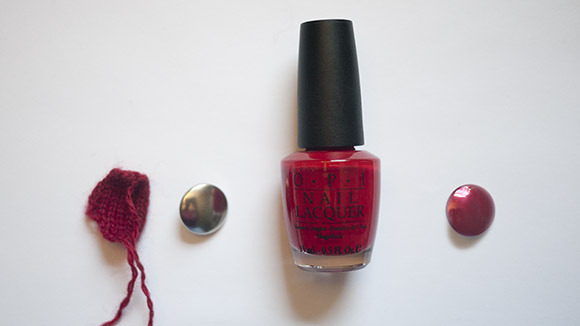
I’ve never successfully made a tiny knitted covered button. Because of this, I suggest you use a medium to large sized covered button kit. I like to use the kind of covered buttons that feature comb-like teeth on the underside because they are perfect for grabbing the edges of knitted fabric. I've used Dritz brand half-ball covered button kits with great results.

TWO
Select a very lightweight yarn–fingering weight works best. Most covered button kits are designed to be used with thin woven fabrics. Thicker yarn doesn't work because it prevents the back plate from snapping into place properly.

KnitDarling-Knitted-Covered-Button3

THREE
Use a smaller needle than suggested to create a very dense fabric. This is more of an aesthetic thing. The piece of fabric you knit has to stretch over the shiny metal button, and any little gaps between your stitches will become very obvious. I always use size 0 needles.

FOUR
Contrary to the kit instructions, make your knitted piece only barely larger than the button itself. This will reduce bulk inside the button, which will make snapping the cover into place much easier. Again, the kits are designed to be used with woven fabrics that fray near the cut edges. We won't have that problem with our custom made knitted covers, so ignore the pattern on the back if the package.

KnitDarling-Knitted-Covered-Button4

INSTRUCTIONS
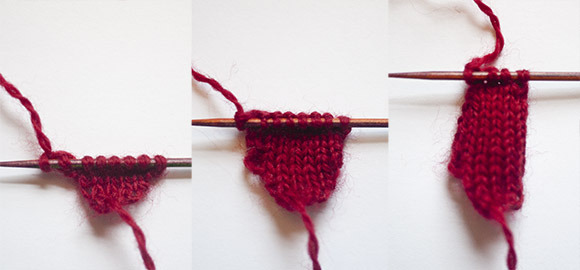
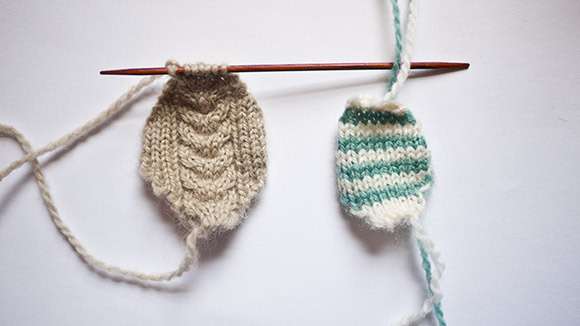
You will be making a little octagon that is just big enough to wrap around the top if the button. You might like to measure the button to determine this size, but I've also done pretty well just estimating it as I go.

Cast-on about 4-8 stitches, depending on the size of your button (about 1/3 the width of the button). Begin knitting the piece in whatever stitch you like, and cast-on one extra stitch at the end of every single row until the piece becomes a little wider than the button itself. At this point, it should be about 1/3 of the total length that you need. Now, knit straight without shaping until the piece is about 2/3 of the total length that you need. Then, begin decreasing one stitch at the beginning of every row until the piece is the right length and bind-off.

KnitDarling-Knitted-Covered-Button5

ASSEMBLE THE BUTTON
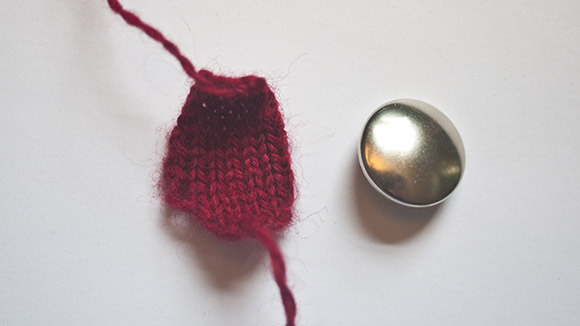
Look at your knitted piece and determine if the fabric is dense enough to hide the shiny button to your liking. If not, it's okay to paint the button with a matching color (use nail polish, acrylic paint, or enamel spray paint).

KnitDarling-Knitted-Covered-Button6

Now, place the knitted fabric with the right-side facing down on a table. Position the top of the button, rounded side down over the fabric. Pull a bit of the fabric around to the back so it catches in the teeth. Take a bit of fabric from the opposite edge and stretch it so it catches on the teeth on the other side. You want the fabric to be tight across the top of the button, but not stressed, if that makes sense. Make adjustments to center the fabric now, because it becomes practically impossible later.

KnitDarling-Knitted-Covered-Button7

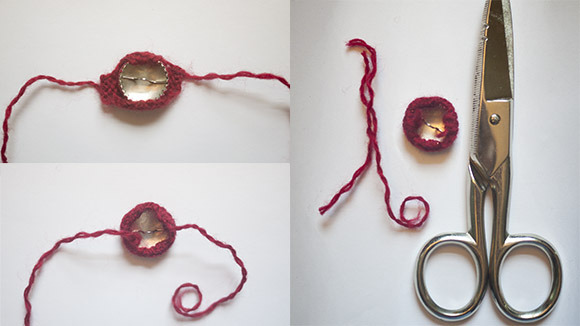
Continue attaching small bits of fabric from opposite sides until the fabric is completely secured. Trim the ends about 1/8" from the fabric.

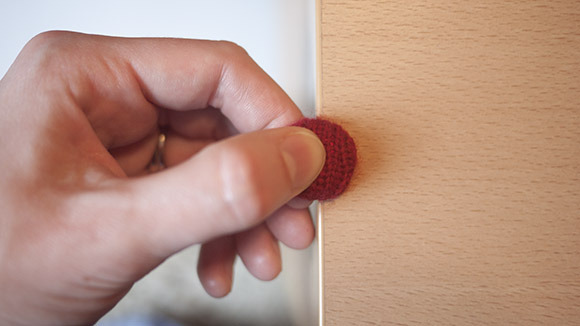
Then, the only thing left to do is snap the back cover plate into place. Refer to the package to see which side is "up" on the back plate. This maneuver is always a little tricky, and occasionally I find it necessary to employ a hammer, but usually I can just use the edge of a table to press the plate into place.

KnitDarling-Knitted-Covered-Button8

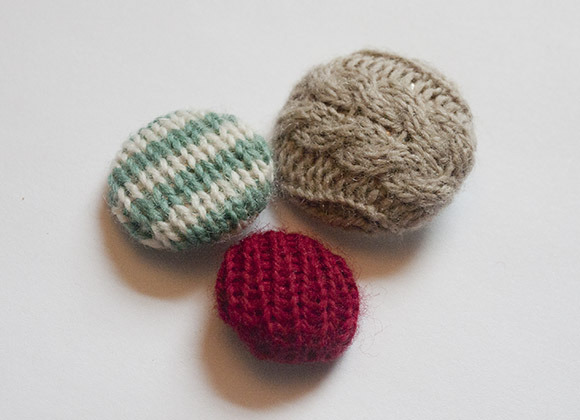
Of course, there are lots of opportunities to get creative with your covered buttons. Try different stitch patterns or stripes. I think it could also look cool to paint the button cover a contrasting color, and let that show through a lace stitch pattern.

KnitDarling-Knitted-Covered-Button9

Do you have any cool ideas, or maybe some tips of your own? Please share in the comments section below!


Jul 1, 2014

Since I finished writing the manuscript for my book, I've been trying to use my extra time to expand my skills. I've had a lot of fun doing so many different things like video production, web design, and even exercise (I've been working up to doing a push-up, and somehow discovered that I like running- nobody saw that coming, especially me!).

I've been all over the place doing things that have very little to do with knitting, but last weekend I brought it home (a little) by taking a two-day intensive machine knitting class at the Textile Arts Center.

KnitDarling-MachineKnitted-Lace

The class was taught by Mandy Kordal, who has her very own beautiful independent knitwear line. She taught us 3 cast-on techniques, how to make eyelets, some simple shaping techniques, and a few different ways to bind-off. By the end of the class, everyone had made a simple slouchy beanie. Here's mine:

KnitDarling-MachineKnitted-Hat

I used two strands of yarn knitted together to get a marled effect. Here's what it looked like right before I "casted-off":

KnitDarling-MachineKnitted-Hat-InProgress

Of course knitting by machine is very different from hand knitting, but I was definitely able to apply my design skills. I have to admit, sailing through a 100 stitch row of stockinette in about 2 seconds was pretty exhilarating. I couldn't help myself when I saw we had some extra time at the end of class, and I whipped up this simple top.

KnitDarling-MachineKnitted-Top

I think owning a knitting machine would be pretty useful because I could quickly test out unusual shapes for my knitting patterns. But the machines are pretty expensive, so unless I find time to produce and sell my knitted items, I'm not sure it makes sense to buy one. If I ever saw one for cheap at a garage sale though, I would snatch it up in a heartbeat!

Have you ever owned a knitting machine? Did you use it much?

Jun 23, 2014

As a creative and curious person, I'm always trying to figure out how things work. That's why I design knitwear, why love learning about quantum mechanics, and why I spend so much time watching video tutorials on the internet.

How websites work has always been a bit if a mystery to me. I have to admit, the Internet seems like a magical place. I don't actually believe there's a genie in my laptop named Safari, but the web still delights and impresses me on a daily basis.

I'm very fortunate that Brian, my web-developer husband, has always taken care of my website needs. But lately, I've been curious to find out for myself what makes my website GO. As a first step I'm learning a bit about front-end web development, starting with HTML code and CSS design.

KnitDarling-Code-KDIt's been interesting, and not surprisingly, the more I learn the more I feel like I'm using my knitting pattern design muscles. I'm organizing information, using special abbreviations, and formatting elements in a way that reminds me of writing a knitting pattern.

I became curious about this stuff because I'm currently in the process of designing a shiny new website for Knit Darling. The process has gone something like this for me:
*design a few things, consult with Brian, find out that I'm crazy, go back to the drawing board, repeat from * until (what seems like) forever. Needless to say, I think more like a painter than a programmer! KnitDarling-NewSitePreview-KD

I'm under no illusion that I will soon have the skills to code any of my new website design for real, but I'm starting to understand how it all works together. So maybe I'll have a few less of those "repeats" in my future!


For those of you that love being first in line, I'm excited to announce that my book, Graphic Knits, is now available for pre-order! Both Interweave and Amazon.com have posted the book for sale on their sites. 

Pre-order sales are very important for authors because those numbers are what drive big orders from large retailers. Of course big orders mean a bigger audience, so I hope you'll check out my book and order yours today!

business-cards-KD

Even though the release won't be until September, I'm really starting to feel the excitement! I just received a big box of business cards, and I can hardly wait to get out there and start meeting new knitters.

I'm going to start organizing a blog tour for the book soon, so I'd love to know what your favorite knitting blogs and podcasts are. Please share in the comments below!

If you read my last post, you know why it's useful to possess a variety of knitting needles made from different materials. With that in mind, the folks at Knitter's Pride have generously offered a deluxe set of their interchangeable Karbonz Needles for me to give away to one lucky knitter!

KarbonzDeluxeIC copy

But wait, there's more!
In addition to that, I'm also doing a pattern giveaway for three of my favorite patterns: Delancey Cardigan (regular or plus-size), Brewster Pullover or my Rosendale Slouchy Hat.

Knitdarling-Delancey-Giveaway

Here's how to enter: 
Leave a comment on this post telling me which is your favorite pattern from the list above. Please share this post because the more people that comment, the more patterns I will give away :)

The grand prize will receive the Karbonz needle set, and all three patterns. Runner-ups will receive the pattern mentioned in their comment.

One entry per person, please. I will email winners next weekend (March 23, 2014), so keep an eye on your inbox!

PS
If you're a fan of free patterns (and who isn't?!), you'll love this new thing I'm doing with my email list. For anyone who signs up, I will send you a free copy of my Cabled Dad Hat pattern as a thank you gift (just for a limited time). The sign-up form is in the right column of my website.

Cabled-Dad-Hat3


NOTE: COMMENTS HAVE BEEN CLOSED FOR THIS POST

Recently, I got a new carbon fiber interchangeable needle set (Karbonz from Knitter's Pride). As you can imagine, I already have an extensive needle collection, so you might ask why I need a yet another set. The short answer? Gauge.

Each of my needle sets are made from a different material, which can affect both stitch and row gauge. I was curious how I would knit with my new needle set, so I designed an experiment.

I began with a ball of 100% wool yarn (Knit Picks Wool of the Andes Worsted) and 4 sets of size 7 needles, all made from different materials:

1. Plastic Resin: Denise Interchangeable Needle Set
2. Wooden: Knit Picks Harmony Needle Set
3. Metal: Addi Turbos
4. Carbon Fiber: my new Karbonz Interchangeable Needles

I knitted up a stockinette swatch (30 sts x 45 rows) with each needle type, then blocked them all very, very carefully to be sure they weren't stretched.

Knit-Darling-Needles-Gauge-Swatches

After the swatches dried and kind of mellowed out for a while, I took careful gauge measurements. Then I used the results to figure the dimensions for an average sized sweater that is 200 sts wide and 150 rows tall.

I was shocked!

The results really surprised me: if I knitted a sweater with one kind of needle versus another, I would have about a 2" variation in either width or length. That's a big difference!

Knit-Darling-Needles-Gauge-01

I was also curious about differences in my "flat vs. circular" gauge because I've had trouble with sleeves not matching the sweater they are attached to. So I got to work on a circular swatch with my wooden dpns.

Results? There is a difference, of course. If I knitted my 200 st x 150 row sweater with a circular construction, it would come out 1.5" narrower than if I knitted it flat with the same wooden needles. Surprisingly, the row gauge was unaffected.

So what's the take-away from all this?
While your results would certainly vary from mine, I think it's important to be aware of how your tools can affect your finished objects and to use this knowledge to your advantage:
1. Knit your gauge swatch with the same needles you plan to knit the garment with.
2. Knit circular swatches for circular garments.
3. The more stitches in a row, the more a difference in gauge affects the finished measurements of the garment.
4. If you need to connect a circular-knitted sleeve to a flat-knitted body, make a separate circular gauge swatch. If you knit like I do, you might need to go up a needle size or switch to a needle made from a different material to get the correct gauge.
5. And for goodness sake, make large gauge swatches! (6"+ is a good rule of thumb)

I hope you found this post informative! I know I will probably reference it often in the future. I'd love to hear what you think in the comments section below.

AND, If you haven't seen Homage: Knit Darling Book 2 book yet, go check it out! The collection features 5 gorgeous new knitting patterns inspired by Modernist art and design, each piece honoring a different pioneering female artist from history. I could not be prouder of the collection!